
Introduction to Azure IoT with Fsharp
![]() Beating the drum of strongly typed function programming in the land of IoT is the textbook
definition of counterculture. Embedded systems have been written in
“high-level” languages like C/C++ forever. New players to the IoT market
yearn for broad-based adoption and think the only way to drive developer
adoption is to JavaScript All The Things! While precedent and low barrier to
entry are certainly compelling, neither are helping us build better, more
robust, provably secure or correct systems. As such, I think there is a very
strong case for languages like F#, especially when leveraging opensource
cross-platform run-times and sdks like .Net Core.
Beating the drum of strongly typed function programming in the land of IoT is the textbook
definition of counterculture. Embedded systems have been written in
“high-level” languages like C/C++ forever. New players to the IoT market
yearn for broad-based adoption and think the only way to drive developer
adoption is to JavaScript All The Things! While precedent and low barrier to
entry are certainly compelling, neither are helping us build better, more
robust, provably secure or correct systems. As such, I think there is a very
strong case for languages like F#, especially when leveraging opensource
cross-platform run-times and sdks like .Net Core.
The goal of this introductory tutorial will be to show how F# fits into the world of IoT while simultaneously providing a broad architectural overview of an Azure IoT solution.
Happy Coding, Bill
Requirements:1. IDE/Editor with
Fsharp capabilities, e.g. Visual Studio or VS Code with Ionide plugin.
- Azure Subscription.
- Nuget or Paket
Estimated Completion Time: 2-3 hours
Other Azure F# Resources
Since this guide primarily covers the use of F# with Azure resources, you might find the following link helpful:
- Guide - Cloud Data, Compute and Messaging with F# - from FSharp.org
- Using F# on Azure - from Microsoft
Data Simulation
For this tutorial, we’ll be simulating wind speed measurements taken from an array of devices. The data will include nested objects like geo-coordinates and observation times. We’ll transmit this data from a device simulator that will act as a field gateway device and publish the data to an Azure IoT Hub. Further post-processing steps will leverage an array of Azure PaaS offerings and harness the power and simplicity of F# all the way through to data visualization.
Though we will be hand rolling the data generators, one could just as easily leverage community libraries like FsCheck, which include wonderful APIs for randomized data generation.
Project ScaffoldTo complete this tutorial, we’ll need two (2) empty
projects created in a Visual Studio Solution. The solution name is up to you; but, I would suggest the following names for the projects as they align with Microsoft’s iot-samples library.
RegisterDevices- the project that will be used to register simulated devices with our Azure IoT Hub.DeviceSimulator- the application that will simulate our IoT device(s) field gateway.
Configuration To save ourselves from hard coding connection strings and
keys, let’s build a configuration file that can be used across all the applications, and have fun with an F# Type Provider while we are at it.
In your solution add a folder call config and create a new file in that
folder called config.yaml. We’ll need two primary groups of configuration
information, one group for our Azure Cloud settings and one group for the
simulated device(s). The cloud settings section will need to store the URI of
our IoT Hub, the IoT Hub’s Event Hub compatible endpoint for reading device to
cloud messages and a connection string to the IoT Hub, which will be used for
device registration and other tasks. I should note at this point that you can
obviously build up the connection string from it’s elements, removing the copy
pasta, but that will be left as an exercise for you.
The following text can be pasted into your config.yaml file, replacing the
{foo} parts with your IoT Hub’s settings which we’ll collect in the next
section. Also, don’t worry about the Device Key yet, we’ll get that filled
in via registration code in a subsequent section.
Creating an Azure IoT Hub
Log into the Azure Portal, if you don’t have an account you can sign up for a free one here that will supply you with $200 of free credit. This demo solution is very light on Azure resources, so don’t worry about draining your free credits, even if you leave it running for a few days.
Once you are logged into the portal select the + icon in the top left corner
of the screen and search for IoT Hub.
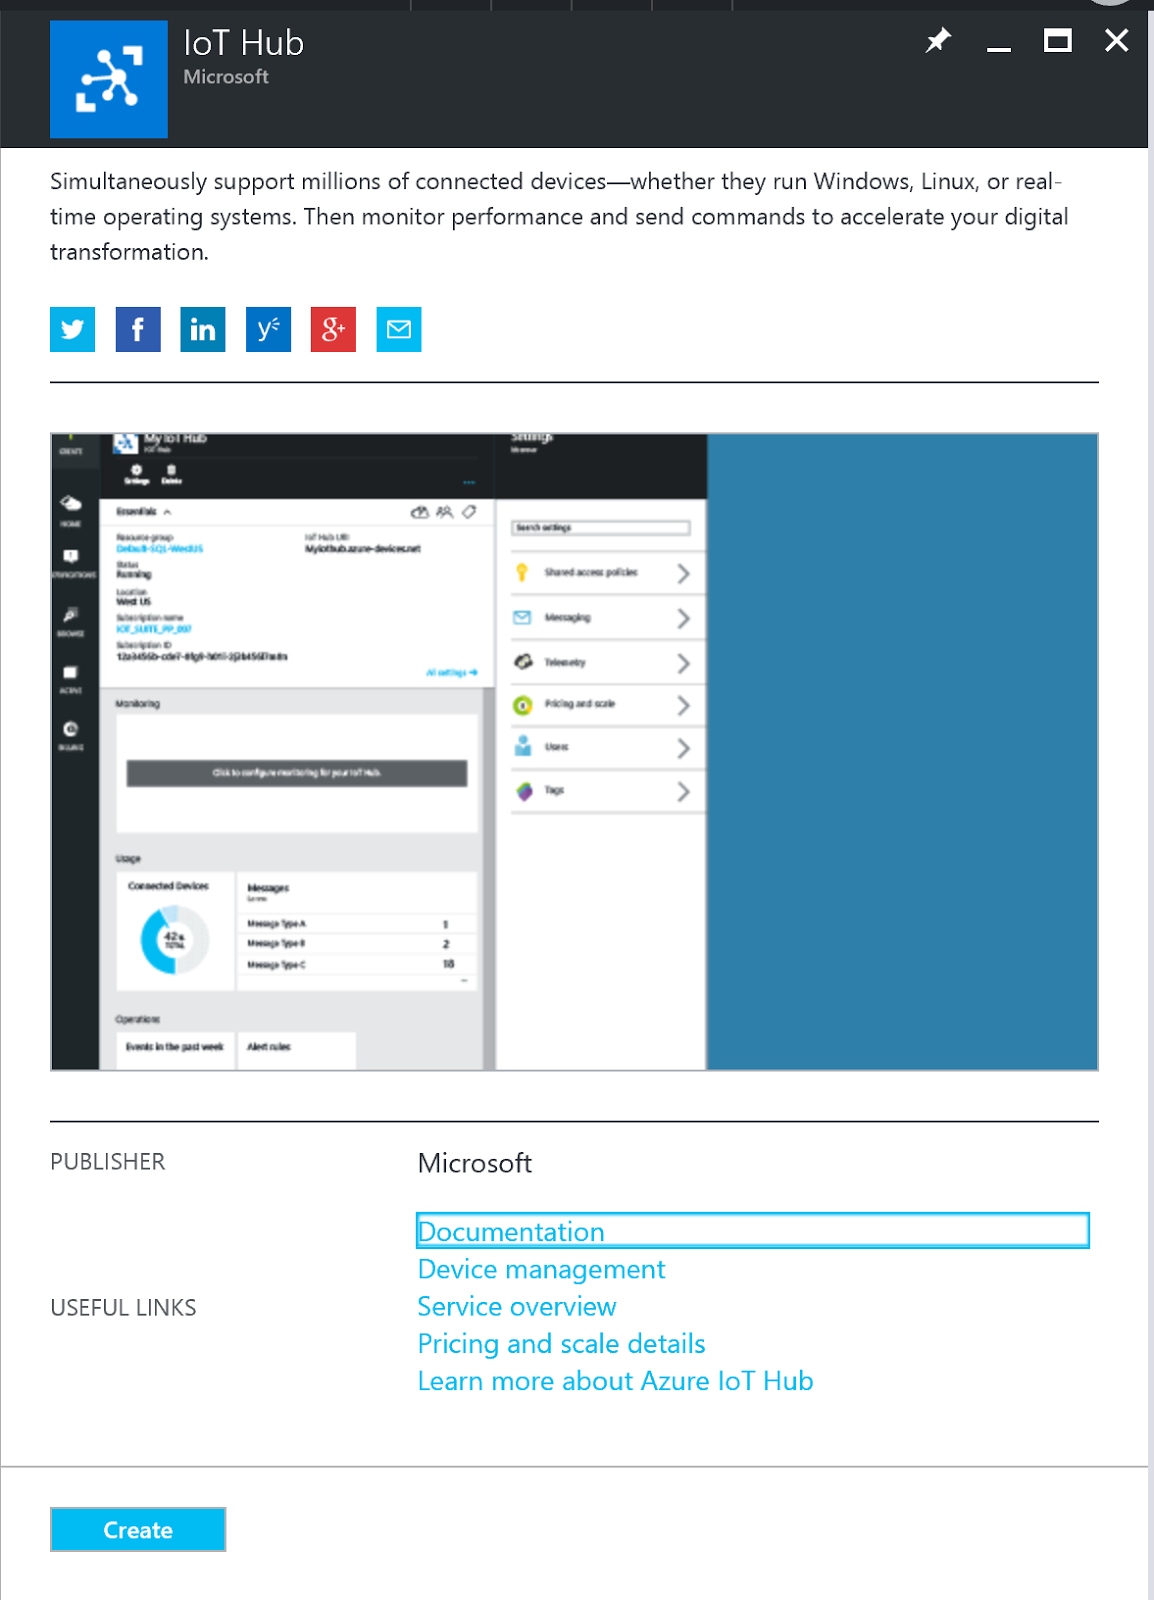
After selecting the resource press Create in the lower left corner of the
newly presented blade.
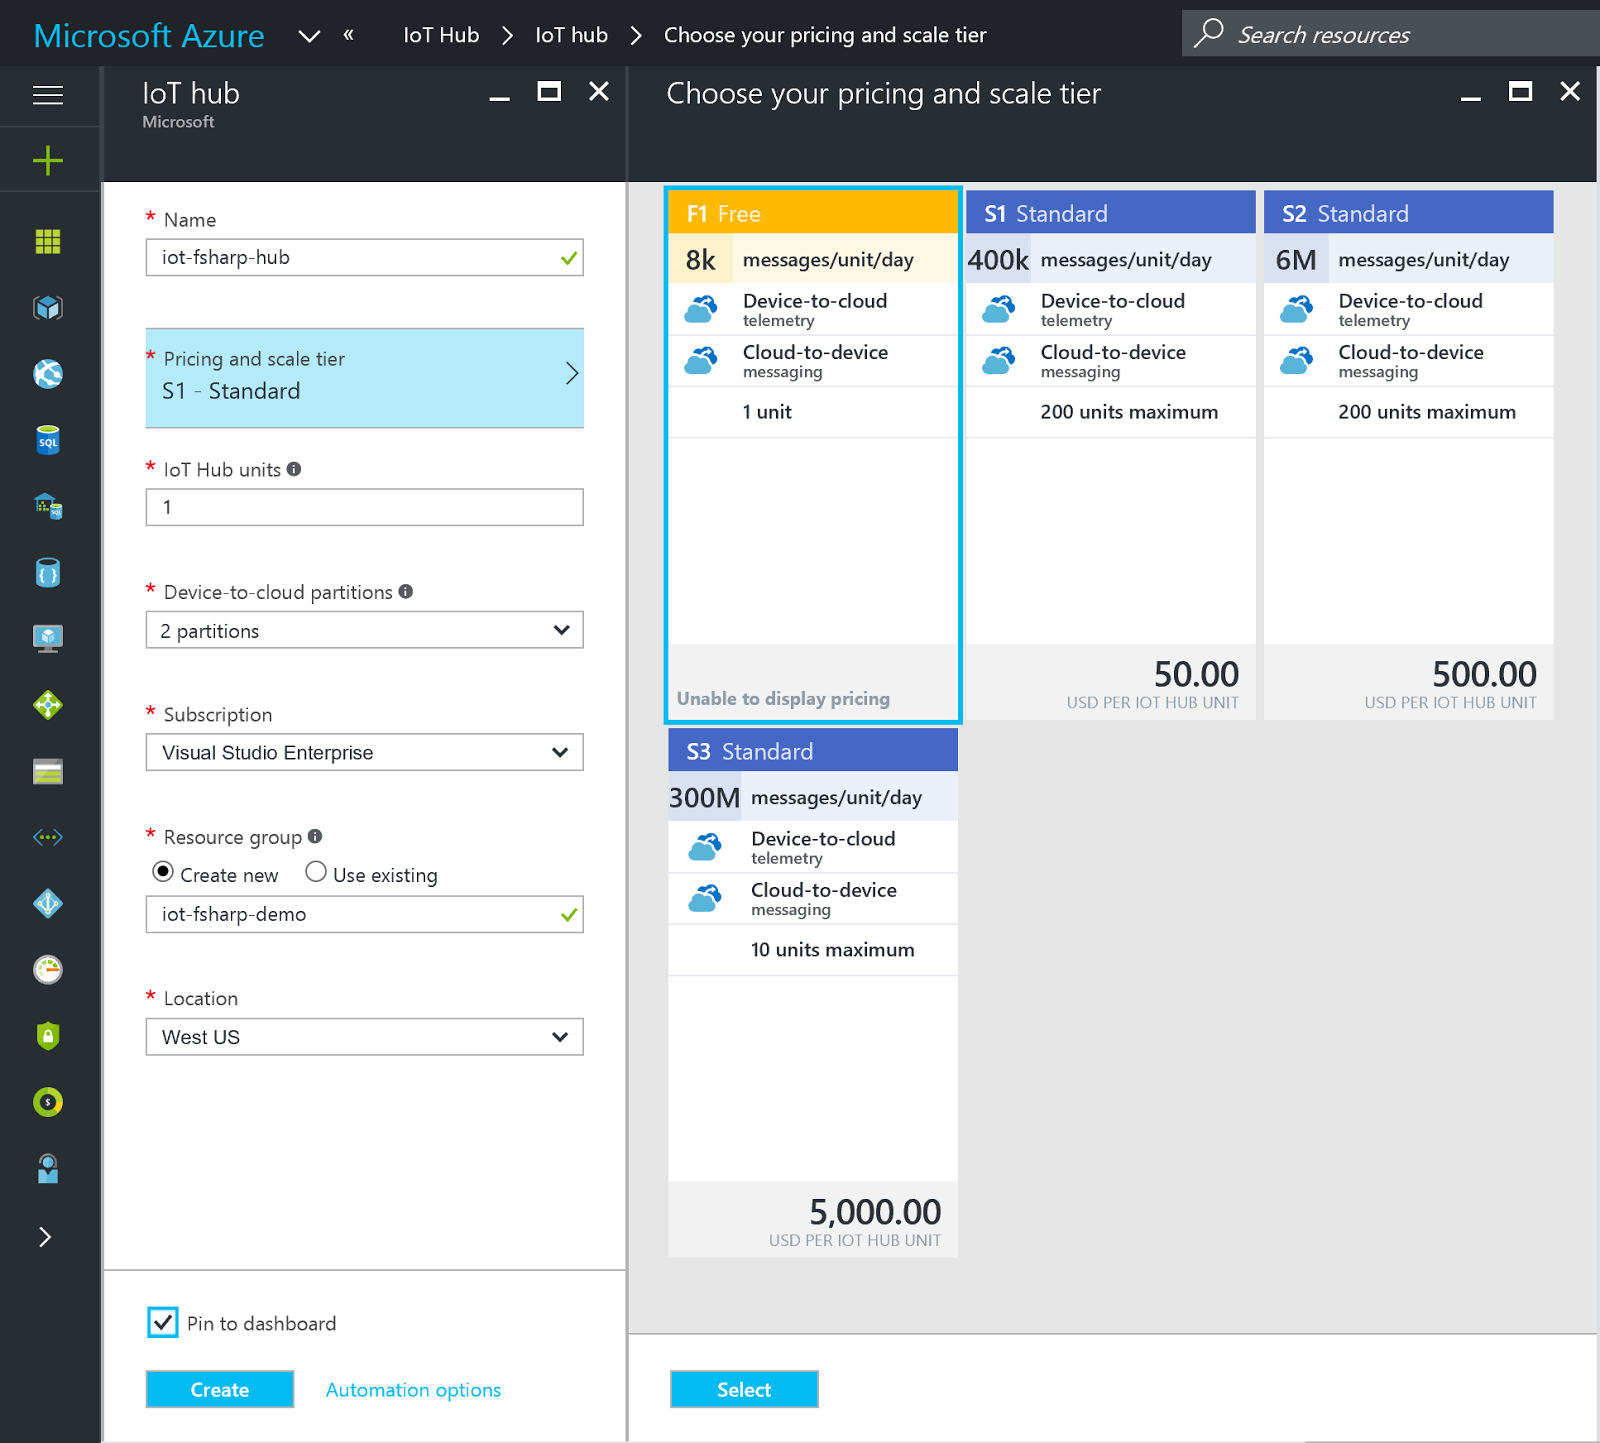
You’ll be subsequently prompted to enter configuration information for the IoT Hub. There are only a few settings here worth mentioning:
- In the
Pricing and Scale Tiermenu, be sure to click into it and select theFreetier. This will provide you with more than enough of a daily messaging rate to complete this tutorial and continue exploring on your own. - Select one (1) IoT Hub Units, if it’s not already populated.
- Change the
Device to Cloud Partitionscount to two (2). This setting helps with scale out for the Hub and having fewer partitions will ease experimentation with reading Device to Cloud messages later. For further reading, check out this introductory article on Event Hubs to understand the mechanics behind partitions. - Make sure to select
create newfor the Resource Group setting, this will allow for easy resource clean up later. - Select an available region that is within your legal jurisdiction and/or close to your geographic local. Please note that data generated by your IoT solutions such as latitude/longitude, city/state/province, postal code, occupancy or facility egress, and/or other pieces of end user information, may be considered Personally Identifiable Information (PII). As such, many countries govern where this data can be transmitted and where and how it can be persisted, even temporarily. It is up to you, the developer, to maintain compliance with these regulations - consult legal aid if you do not fully understand these requirements.
After entering the IoT Hub configuration information, press Create - you
will be returned to the your Portal Dashboard while Azure sets up the Hub.
Now would be a great time for an espresso!
(a few minutes later)
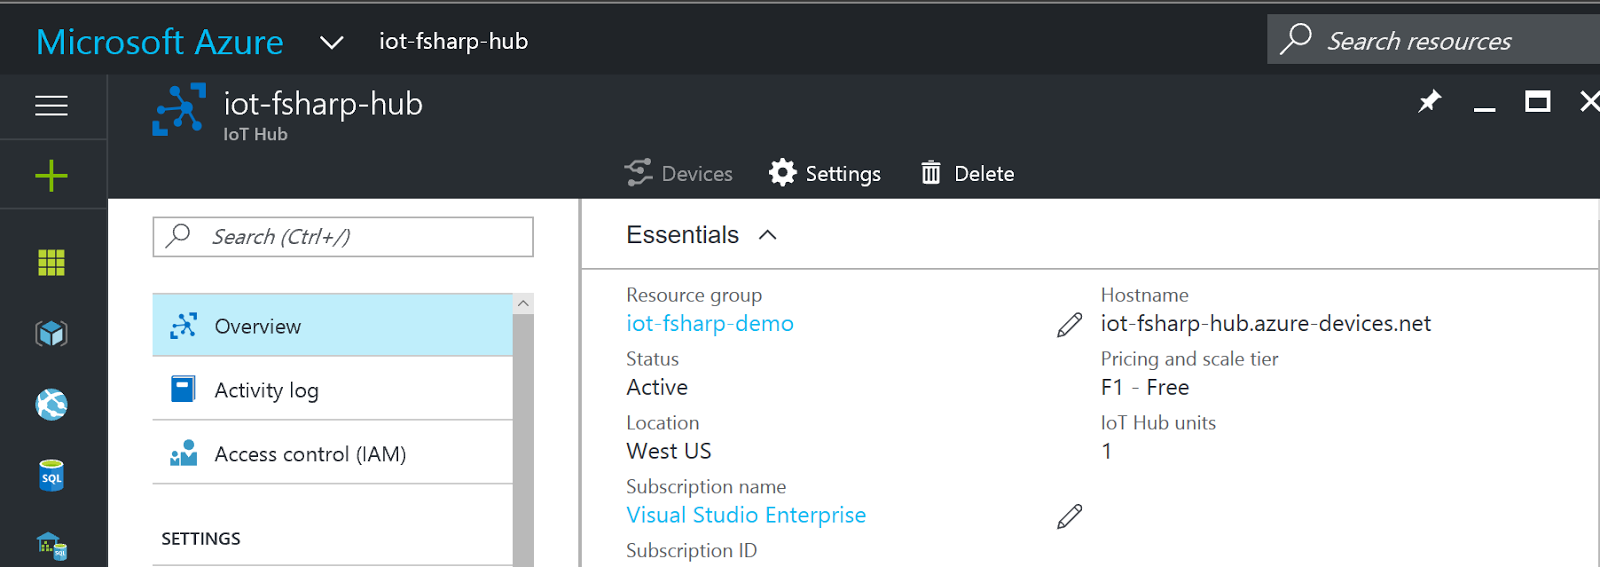
With an espresso in hand, navigate to the newly created IoT Hub. While it’s worth exploring all the good information presented in the Hub’s main portal blade, we’ll need to make note of a few specific things before writing the application code.
In the section labeled Overview, copy the IoT Hub’s host name value into
the config.yaml file’s IoTHubUri setting. My IoTHubUri value will be
iot-fsharp-hub.azure-devices.net.
Scroll down the list of sections until you find the Shared access policies
entry and click on it. The blade will be extended with access accounts -
select the iothubowner account. Please note that for anything beyond toy
solutions, fine tuned access controls that restrict user and subsystem
permissions is imperative. Giving an application or other user the
iothubower permission level is a recipe for a security disaster!
Once the iothubowner entry is selected, a new blade will be presented with
security information. Copy the Connection string - primary key value into
the config.yaml file’s ‘ConnectionString` setting.
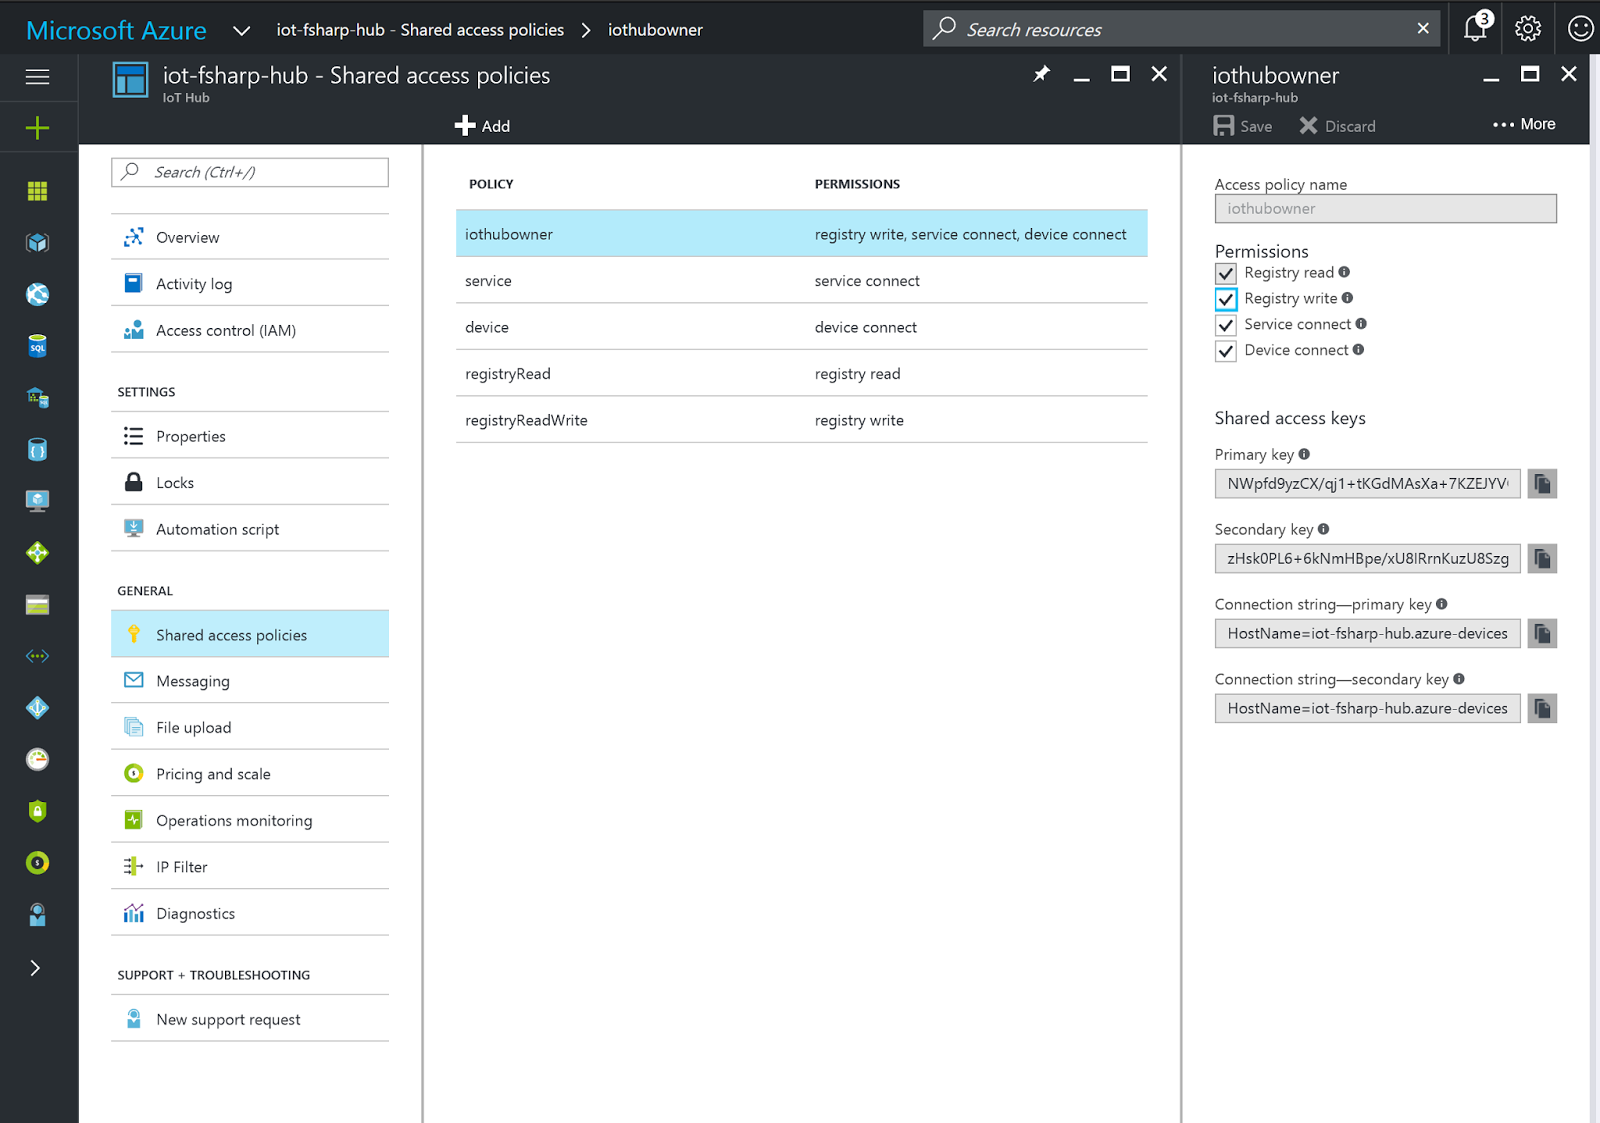
Continuing with the laundry list of disclaimers … note that the portal has provided you with two (2) keys and two (2) corrosponding connection strings which include those keys in their bodies. All applications that connect to the IoT Hub should have the capability to fail over between theses keys to ensure application up-time. Also note that you’ll want to develop a method for key rotation that meets your security requirements. Though the posts are a bit old (2012), I suggest reviewing Bruce Kyle’s awesome Windows Azure Security Best Practices series, to help your develop a cloud security mindset.
With our configuration set up, let’s get to writing some F#!
Device Registration The next step along this IoT journey will be to write a
small application that registers the simulated device with the IoT Hub; this process will generate a key that will subsequently be stored in the config.yaml file.
With the solution open in Visual Studio open the Package Manager Console -
Tools > Nuget Package Manager > Package Manager Console -> Select the
DeviceIdentity project and run the following commands to install the
application’s dependencies:
- Install-Package Fsharp.Configuration
- Install Package Microsoft.Azure.Devices
We are pulling in the Fsharp.Configuration package because it includes a YAML
type provider that we’ll use to easily parse the config.yaml file.
The application code will start simply by opening the dependent
libraries, creating a
Configtype using the YAML Type Provider and then printing out to the console the Hub’s connection string.
With the shell of the registration application reading from the config file, we now need code to create an IoT Hub Registry Manager, add devices, upgrade our key printing capabilities and persist the Azure generated Device Key to the config.yaml file. So in that order:
The above code should replace the existing printfn call in the
Program.fs file. Notice that we’ve also run the addDevice function to
kick the whole process off.
Now baring compilation errors, set the DeviceIdentity project as the default
startup project, and run the application; the config.yaml file will be updated
with the Azure generated Device Key. But, we have a problem … running the
application a second time will result in a runtime
DeviceAlreadyExistsException; so lets handle that. We’ll start with adding
a function that can Get a device’s configuration from the IoT Hub based on
it’s Device Id in the event that it already exists in the device registry.
Additionally, we’ll enhance the addDevice function to properly handle the
already exists exception.
This code uses the simple try ... with expression to attempt the
addDevice call, falling back to the new getDevice function in the event
that the application encounters the aforementioned already exists exception.
Deleting the Device Key in the config.yaml file and a re-run should now
properly demonstrate our intended behavior. Oh, and congratulations - you’ve
successfully added a device to your Azure IoT Hub using your cunning wits,
some copy pasta and a bit of friendly F#!## Device Simulator The next step in
the process will be to create a simulated device. For this tutorial, we are
going to simulate a field gateway device collecting wind speed sensors that
have been placed at random geographic intervals in the area surrounding the
Microsoft campus in Redmond, WA.
We’ll need to initialize the project by installing the required dependencies.
Run the following commands in the package manager console after selecting the
DeviceSimulator project in the console’s project drop-down:
- Install-Package Fsharp.Configuration
- Install-Package Microsoft.Azure.Devices.Client
The device simulator application layout should be familiar after coding up the
registration application. It begins simply enough by opening the required
dependencies, again creating the configuration type using the YAML Type
Provider (though this time we’ll set the ReadOnly flag to true to prevent
accidental changes), extracting some config data and building a device client
for the IoT Hub.
Though occasionally controversial in some circles, I am a strong advocate
for pulling out data as types and there is a prime opportunity for that with
the data simulator. We are in need of a record type that can express a
simulated wind-speed measurement. This record type should include not only
the measurement information but also the unique Device Id, some geo-coordinate
data and an observation time that we can use further down the line for
monitoring or graphing. Let’s add this new record type to our Device
Simulator’s Program.fs file just after the config type definition.
With the measurement type defined we’ll need some functions to assist with mocking the field array. I prefer to work these types of development tasks from the top down, effectively starting with the result and refining the functionality at progressively lower levels. So let’s give that a shot here and look over our requirements:
- Send a stream of measurement events to the IoT Hub.
- Events/measurements should have some temporal spacing between them, i.e. we’ll take measurements every N seconds.
- Model several devices producing data and concatenate their results such that the simulator application functions more as a field gateway than single measurement device.
- Sample data stream should be be effectively infinite.
- Communicate with IoT Hub in an asynchronous way.
So how are we going to accomplish this? Let’s begin by saying that we’ll have an infinite sequence of strings, that are themselves delimited measurements, that we’ll pass to some function that will transmit the string to the IoT Hub on 5 second intervals. Breaking the problem in half, let’s define two further functions, one that creates an infinite sequence of measurement data and another function that takes a string and sends it to IoT Hub.
The data send task is rather straightforward. We’ll create a new Message based off the conversion of the string data to a byte array and then pass that message onto the Device Client for transmission to the IoT Hub. The function will finish with a side effect, by printing the transmitted message to the console.
Creating the (nearly) infinite stream of data is equally as trivial thanks to a few helper functions that F# brings to the table. If you are coming from C# and are familiar with Linq, then the F# Sequence should be familiar territory as it’s mental model maps nicely onto IEnumerable … a (potentially) infinite series of elements that are lazily evaluated.
F# makes data generation a non-issue as we can create an infinite sequence of
elements using Seq.initInfinite. Seq.initInfinite must be passed a
function with the signature (int -> ‘T) that is used to generate a sequence
elements <T> for each int` that is passed in. The astute reader will
notice that it is possible to run out of integers, so we wont technically have
an “infinite” sequence. But given that we are spacing our data out in 5
second increments, the simulator should be able to run for roughly 340 years
before the sequence runs out of elements.
In this case, we’ll pass Seq.initiInfinite a concatenated string of
randomized wind-speed measurements based on an array of pre-initialized sites
by using:
msftSites |> Array.mapi (fun idx site -> windSpeedMessage site idx)
Mapping the windsSpeedMessage function over the collection of msftSites
along with an indexer, using Array.mapi will allow us to randomize the site
data and ultimately generate an Array of telemetryDataPoint records. To
generate our list of sites, let’s do a naive port of this Stack Overflow
code over to F# and initialize an Array
of 10 GeoCoordinates, priming the computation with the Lat/Long for
Microsoft Way in Redmond, WA.
Similarly, we can create a wind-speed message function that will return a
telemetryDataPoint record built up from the randomized site data, and a
randomized wind-speed centering on 10 (units, could be mph).
And here is all of our code put together:
Message CompressionIf there is anything we can count on, it’s that
requirements change. Unfortunately for us, our Partner has an additional constraint around message size. They would like to compress the data we send to the IoT Hub to save on gateway to cloud bandwidth. Low bandwidth situations often call for data compression in one form or another, so let’e revisit the Device Simulator and enhance it with the ability to perform data compression.
The functional nature of the Simulator application makes adding additional behavior, particularly additional data processing, a snap!
Open the Program.fs file of the Device Simulator project and add the following open:
open System.IO.Compression
Now we’ll do a naive port of Mads Kristensen’s gzip compression blog post, to
F#. We’ll also need to update the dataSendTask to compress the delimited
string of measurements and decompress the compressed string for a console
print - just to prove that we have compression & decompression working!
Moving Data with Azure Event Hubs
Given the change in requirements that
added compression, we’ll need to enhance our solution architecture to not only
shred the delimited measurement data, but also to decompress the messages.
There a are a handful of ways to accomplish this in Azure and given that
Functions recently entered General Availability, let’s give that path a shot.
While IoT Hubs are a distinctly different service from Event Hubs, they do
provide an Event Hub compatible interface. We’ll leverage the IoT Hub’s Event
Hub interface to wire up an Azure Function that will decompress our messages,
split them on the | delimiter and forward them onto a new Event Hub for
further processing on our way toward PowerBI visualization.
Let’s begin by building an Event up that we’ll target from our Azure Function.
Log into the Azure Portal and search for Event Hubs. The selection you are
making is for the service to which we’ll need to add an Event Hub to for the
project.
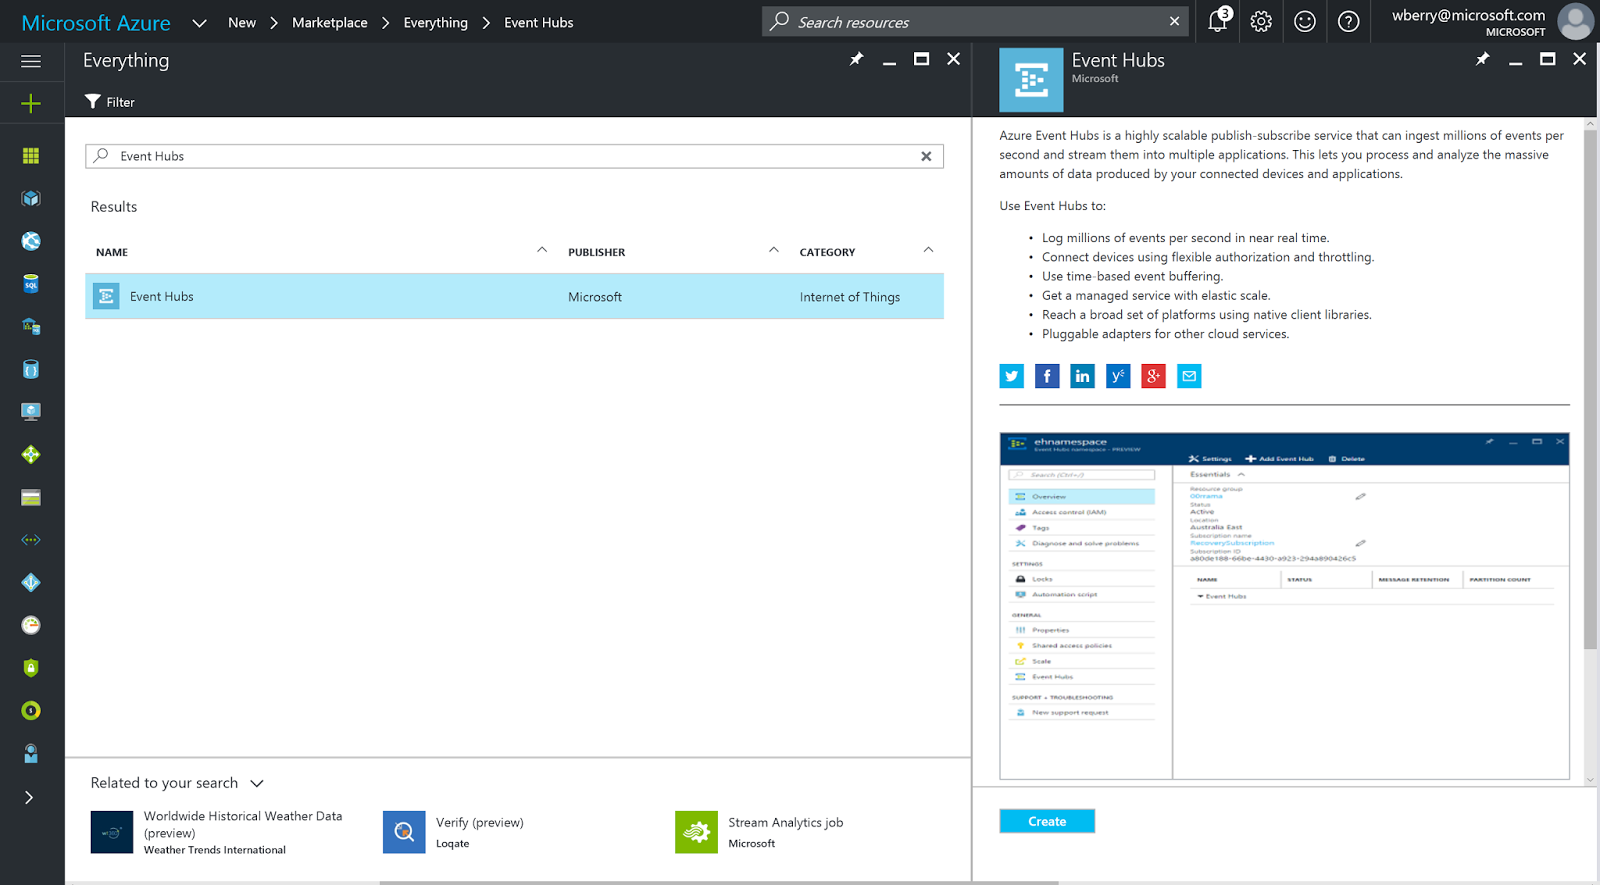
After pressing Create, you’ll see the main overview panel for the Event Hub
Service. Scroll down to Event Hubs, press the + Event Hub tab and enter
in a name for the new Event Hub. All the other settings can be left
defaulted. Note that this process will automatically add a storage account
with a name that is part hub name and part GUID.
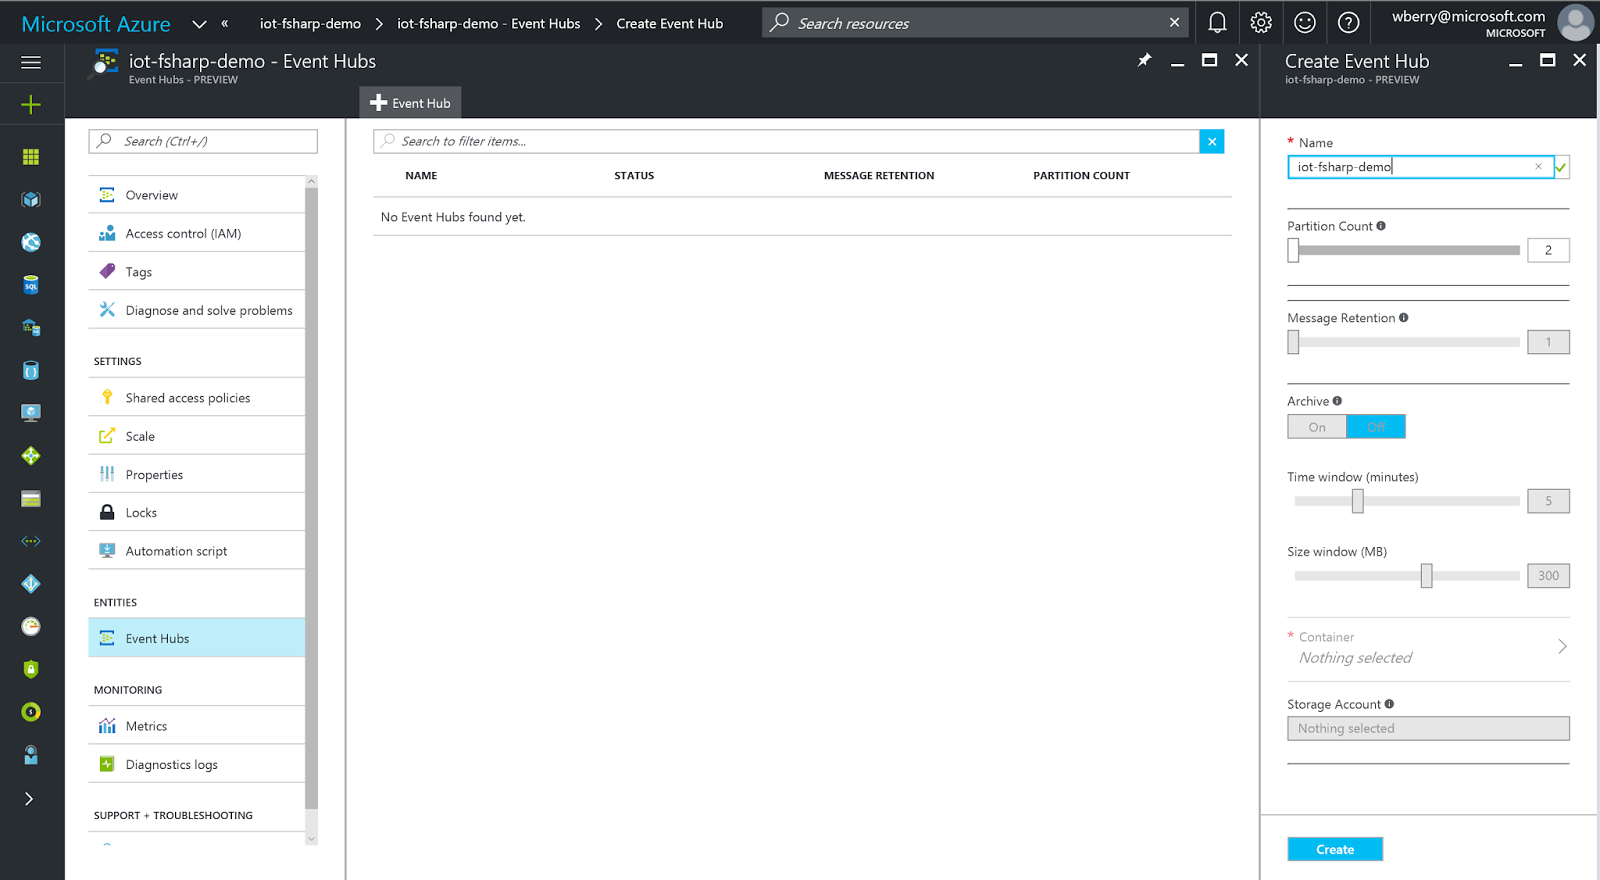
The new event hub will take a few minutes to deploy and will show up in the
center pane of the image above. Once the event hub is displayed, select it
and scroll down to Shared access policies. A new pane will open, select +
Add and create a new policy with Manage claims. The blade should now
refresh and present primary and secondary tokens as well as connection strings
for those tokens. Select the primary connection string and paste it into a
text editor - we’ll need to modify it slightly before using it in our
application.
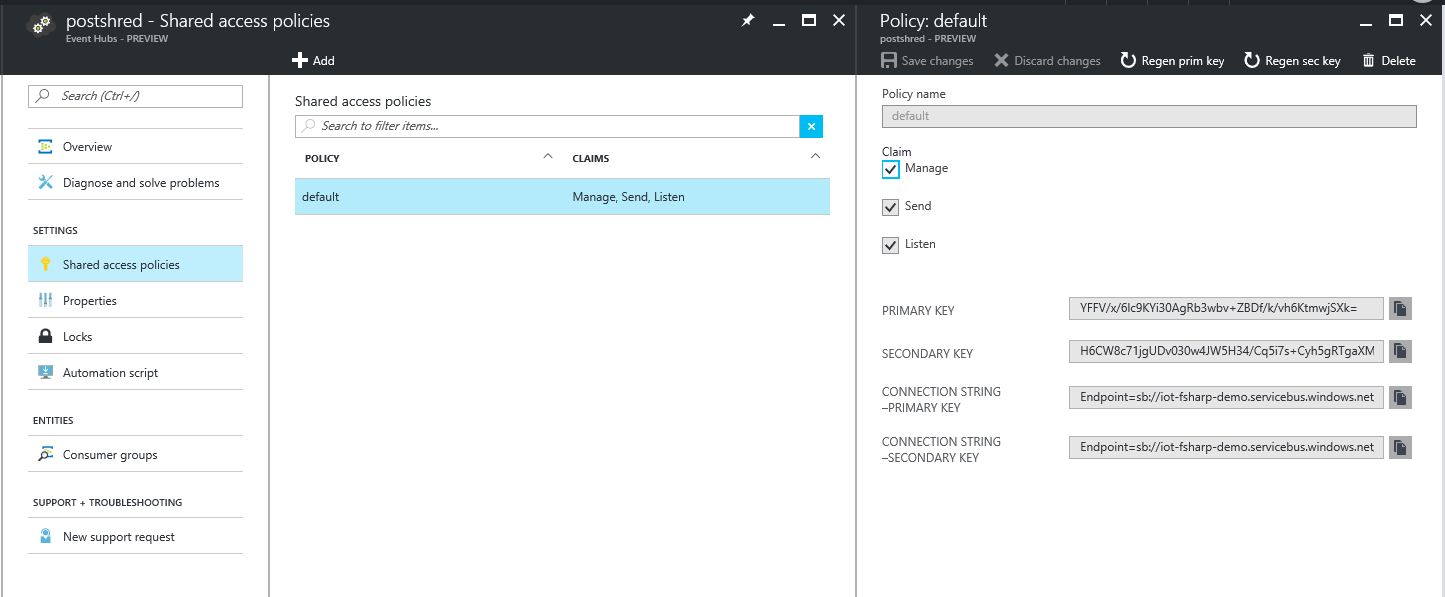
The connection string should look like this:
Endpoint=sb://{hub_service_name}.servicebus.windows.net/;SharedAccessKeyName=default;SharedAccessKey={key};EntityPath={hub_name}
Split the string at the last semi-color (;EntityPath=...) and place it on a
second line for later use.
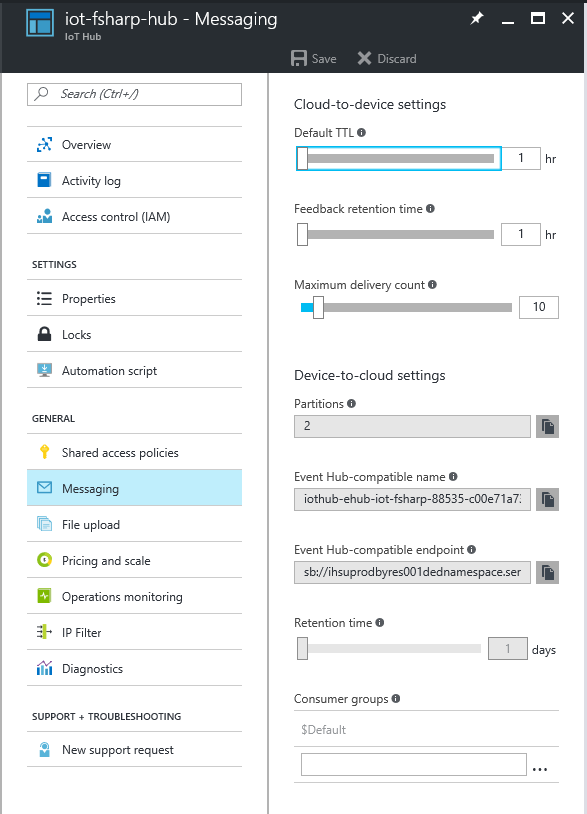
While we are gathering connection string data, let’s pull the IoT Hub’s Event
Hub interface connection information. Navigate back to the Portal Dashboard
and select the IoT Hub. Scroll down to Messaging which will open a second
pane containing the Event Hub interface information for the IoT Hub. Copy
both the Event Hub-compatible name and the Event Hub-compatible endpoint
strings and save them off to the aforementioned text file.
Navigate back to Shared access policies, select the iothubowner policy and
copy the Primary key value into the text file.
Azure Function With batched and compressed data flowing from the device
simulator to IoT Hub, we now need an Azure Function that can decompress the
message, shred the concatenated sensor data and re-post each individual
message onto the new event hub we created in the previous section. While
Azure Functions are relatively straightforward, there are a number of steps to
this process and many features are marked as being in Preview and/or
Experimental - keep in mind that some things may be slightly different than
shown below.
In the Portal, select the + icon in the top left and search for Function App.
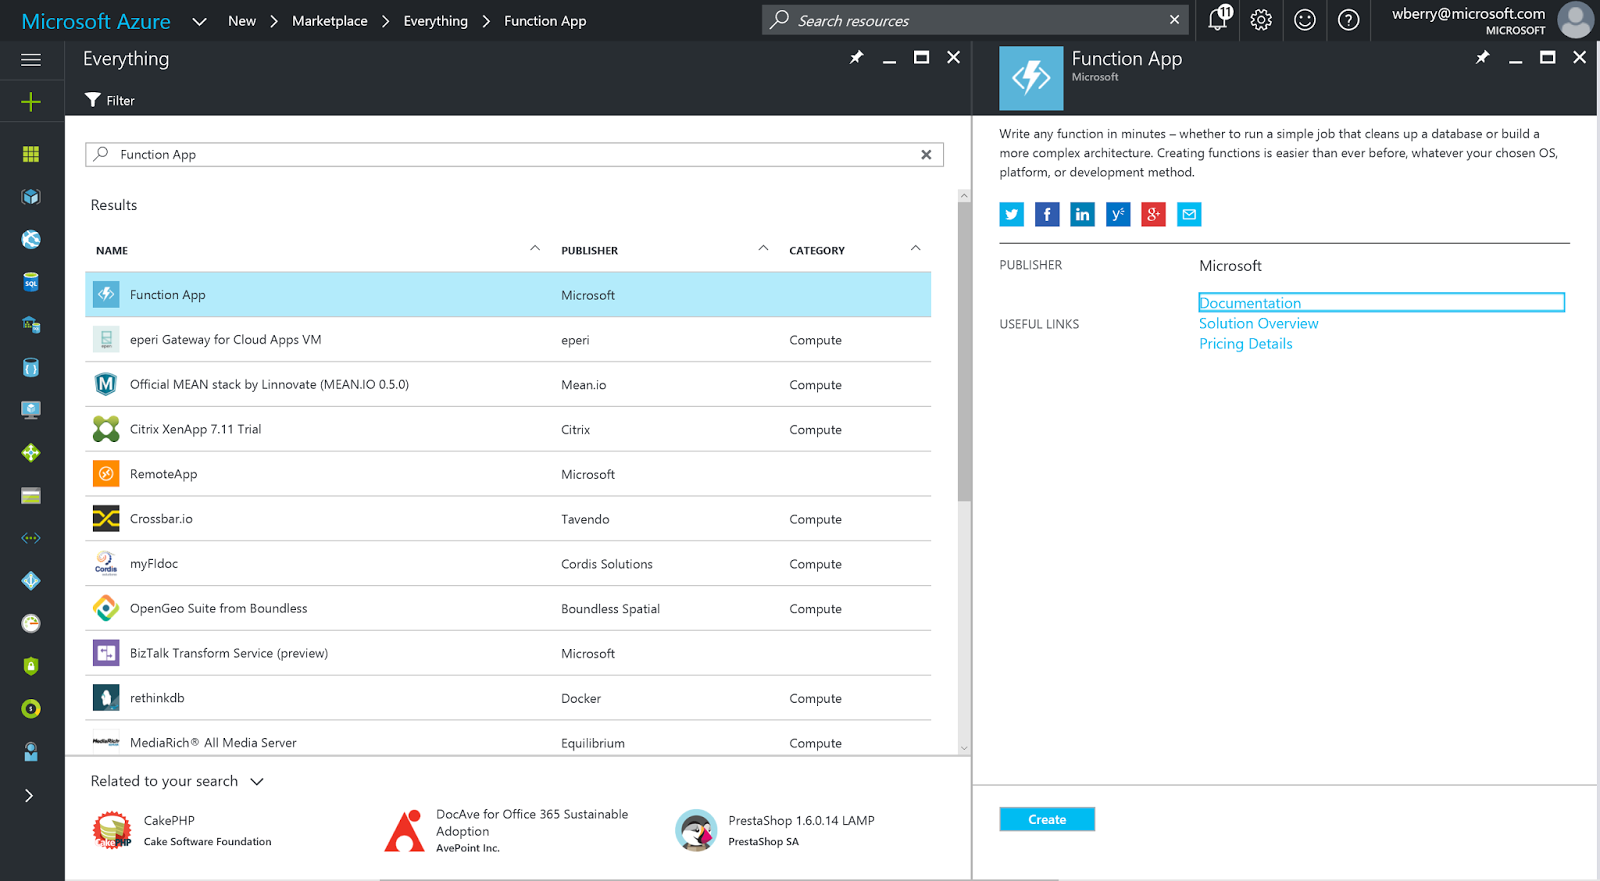
Press Create to kick off the deployment - the app should only take a few
moments to create.
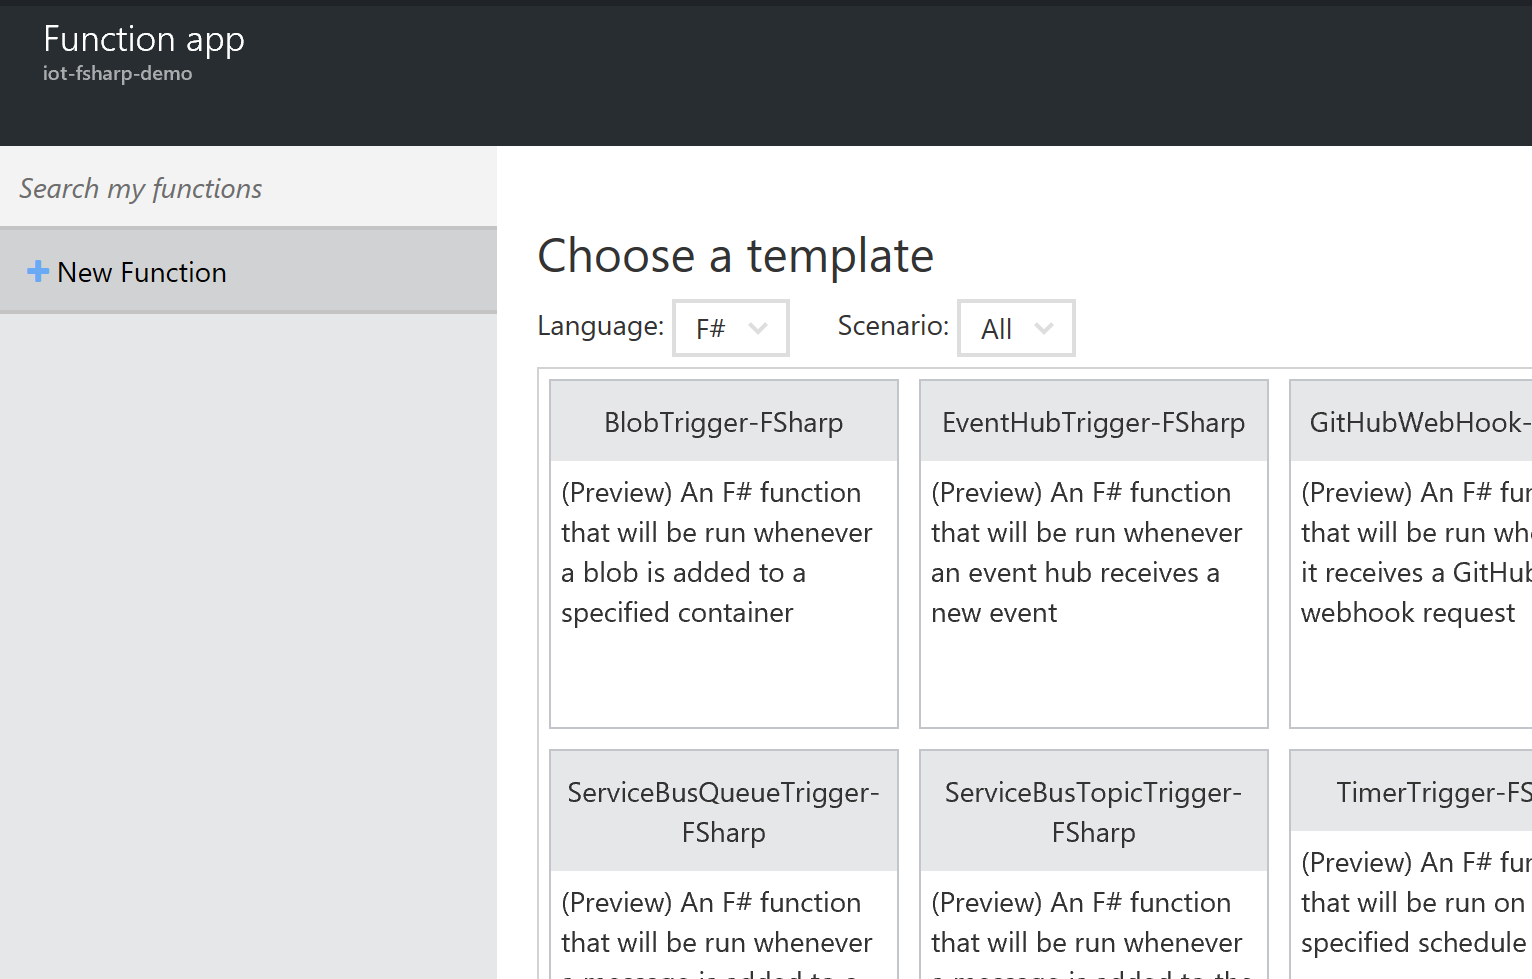
Once the Function App is deployed, a quick-start blade will present options to
create C# and JavaScript functions. Use the + New Function tab in the upper
left corner to reveal the full template list. Using the language drop-down,
filter for only F# templates and select the EventHubTrigger-FSharp template.
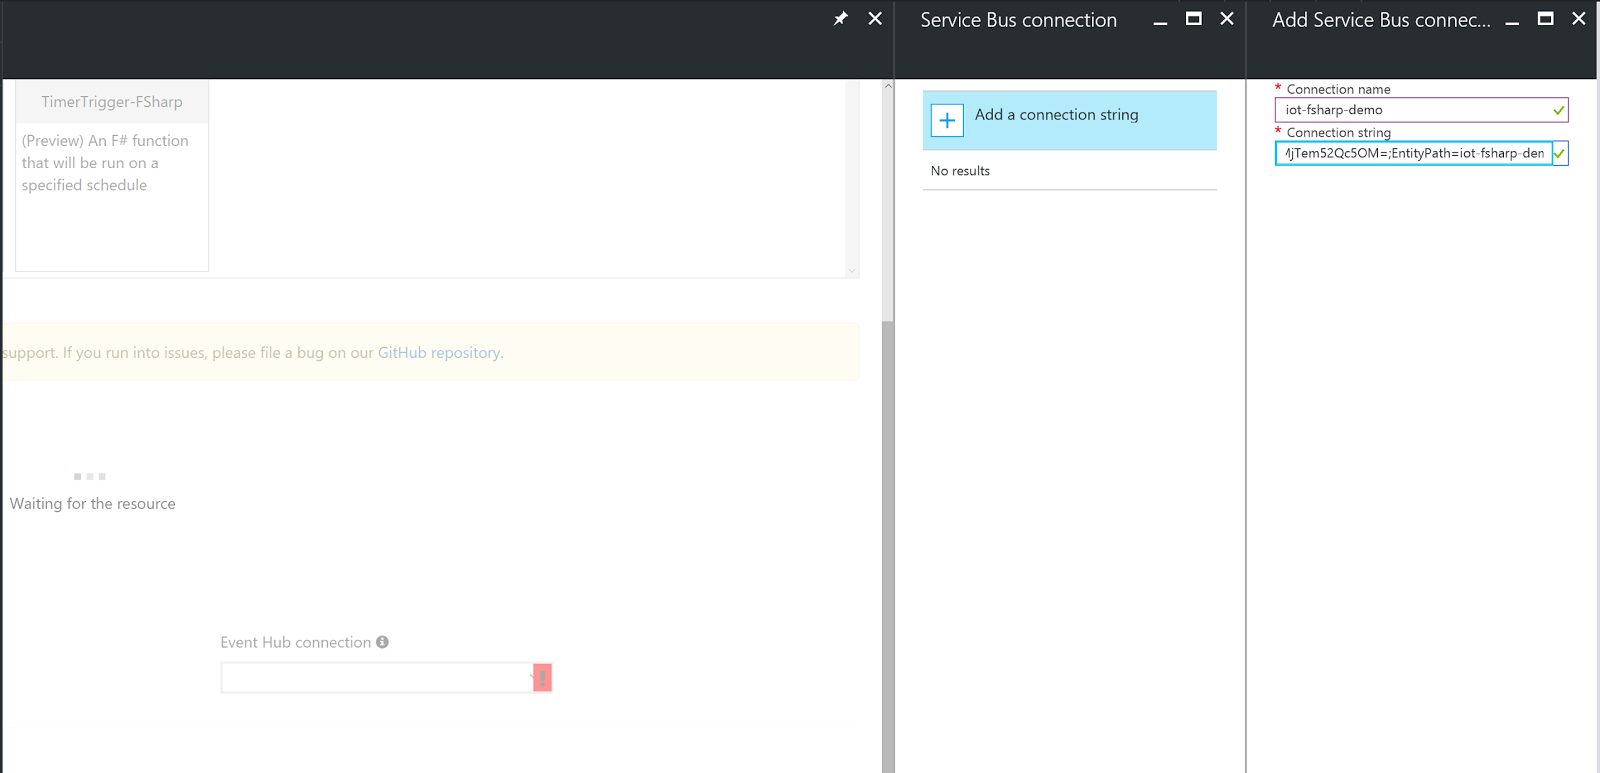
With the EventHubTrigger-FSharp template selected, a pane will show up below
the templates prompting for input data.
Give the function a name. In the text box for Event Hub name, enter the
Event Hub-compatible name from the IoT Hub that was saved off to your text
file in the previous section. Continue by pressing the new button next to
the Event Hub connection text box. This will present a new blade where
we’ll enter the connection string for the Event Hub interface of the IoT Hub.
In the text file paste this template connection string and add the values saved off earlier:
Endpoint={Event Hub-compatible endpoint};SharedAccessKeyName=iothubowner;SharedAccessKey={iothubowner_primary_key}
The result should look like this:
Endpoint=sb://ihsuprodbyres001dednamespace.servicebus.windows.net;SharedAccessKeyName=iothubowner;SharedAccessKey=NWpfd9yzCX/qj1+tKGdMAsXa+7KZEJYVQ9Z9vZDAiBo=
Paste the connection string into the Connection string field and press OK.
Back in the template pane, press the Create button at the bottom of the
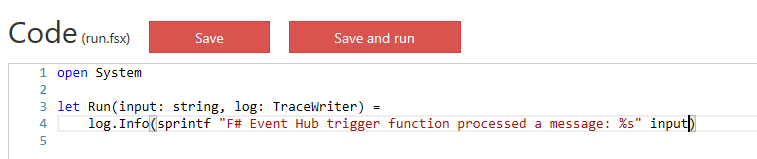
blade. The portal will present a run.fsx file, and likely some error messages
that can safely be ignored for now.
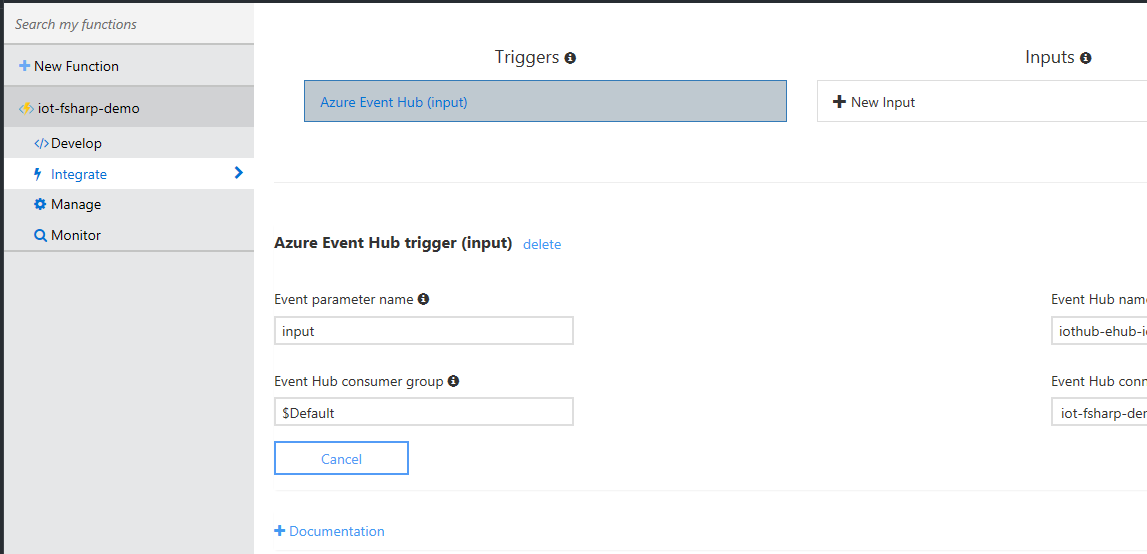
Select the Integrate tab under the Function and update the Event parameter
name to input and press Save.
Click back to the Develop tab and update the Run function’s first parameter
name, as well as it’s use in the log statement, to input. Press Save and
run. The Function should compile and execute.
In order to post the shredded messages to our Event Hub, we’ll need the
WindowsAzure.ServiceBus Nuget package. Thankfully, the Functions service
provides an easy mechanism to add dependencies. In the upper right corner of
the Function work-space, select View Files and press +Add at the bottom of
the newly presented pane. Enter project.json and press enter.
Much like the ASPNET CORE projects, we can add project metadata, and
dependencies, to the Function app using the project.json file. The text below
can be pasted into the project.json file, edited and saved, which will kick
off the Nuget package restore process.
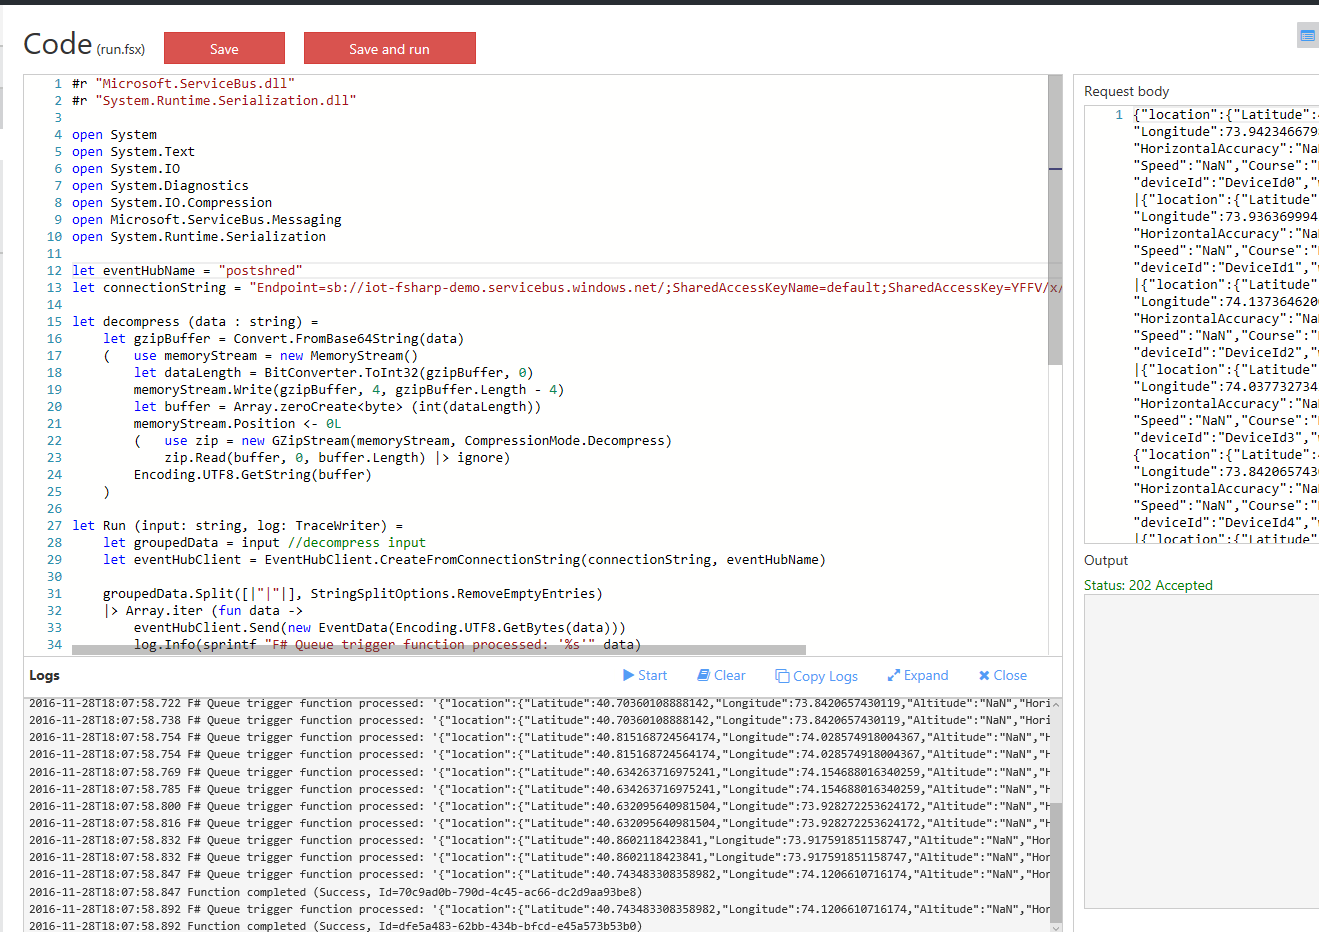
Flip back to the run.fsx file and let’s get working on the code for decompressing, shredding and re-posting of the simulated sensor data.
Delete the existing contents of the run.fsx file and add in our reference
directives and open expressions:
Bind two identifiers that will hold the target Event Hub name and connection
string information from the previous section (the connection string we split
on EntityPath).
Add in the decompress function we used in the RegisterDevices project and
start the binding for the Functions Run function like so:
The Run function needs to create an Event Hub client, decompress the input
string, shred the batched sensor data and re-post each sensor measurement
using the Event Hub client. We can easily bind the decompressed data to an
identifier in the run function and create the Event Hub client like so:
The last thing we need to do is split the grouped data on the | delimiter,
iterate over the array result of that operation and ask the eventHubClient to
Send each JSON payload. Here is the complete function code including the
split and re-post.
Notice the added debug log statement that we can now use to test our function.
In the upper right corner of the Function page press Test to reveal a test
pane. Paste the following text into the Request body and press Save and
run.
The function app will re-compile and execute on the test data, producing a log output like so:
Azure Stream Analytics
With the Azure Function properly decompressing and shredding the IoT Hub data, and posting the results to our Event Hub, we can now focus on aiming our sensor data at PowerBI for display. The easiest way to set up a properly shaped streaming dataset for PowerBI is to pass the Event Hub events through an Azure Stream Analytics Job (ASA).
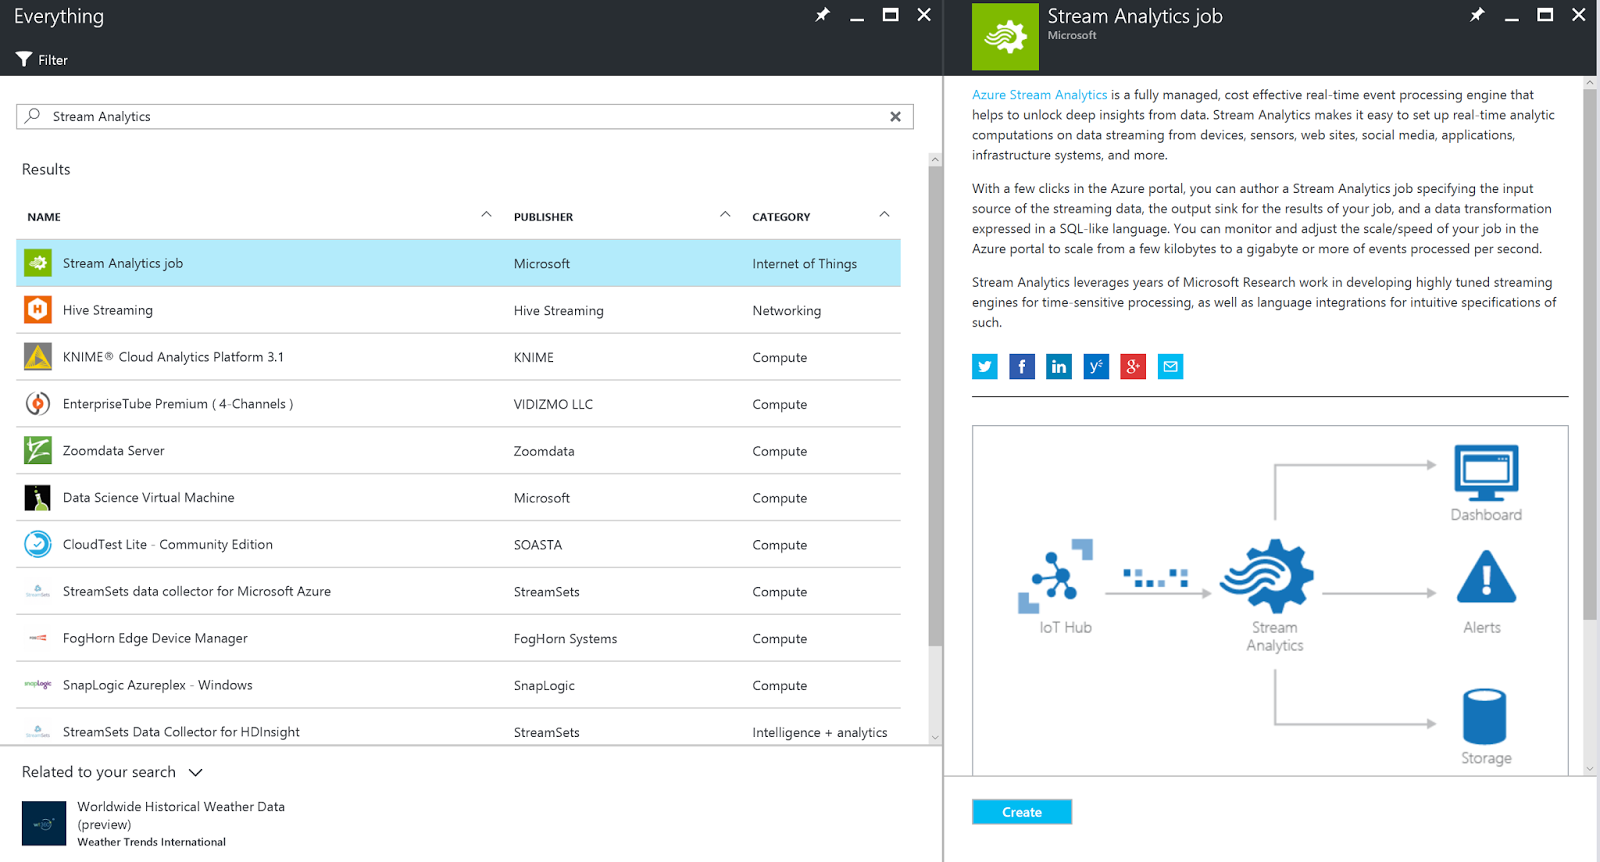
Back in the Portal, select the + icon in the upper left corner and Search
for Stream Analytics. Select Stream Analytics Job and press Create in
the new blade.
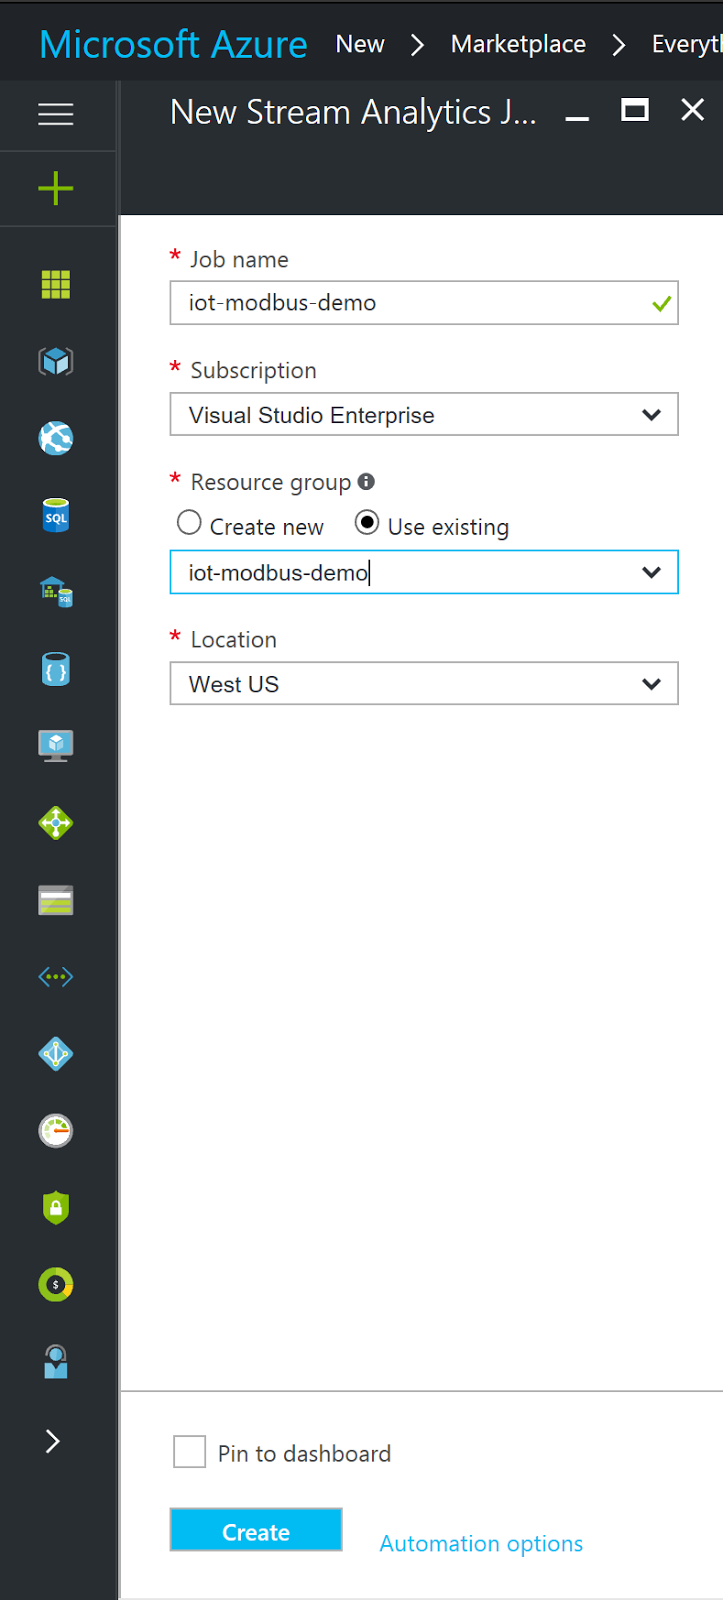
The Portal will present a new configuration blade that requires a Job name;
be sure to add the job to the existing resource group for cleanup later. Press
Create to kick off the deployment of the Stream Analytics Job.
Once the deployment completes, select the Inputs tab of the ASA job. Press
the + Add button at the top of the new pane and enter the following
information:
- Input Alias - this will be the value we reference in the
fromfield of the ASA query - Source Type - set to
Data Stream - Source - select
Event Hubfrom the drop down - Subscription - select
Use event hub from current subscription - Service bus name - select the event hub service name created a few sections ago
- Event hub name - select the event hub name created in the previous event hub service
- Event hub policy name - select the policy that maps to the
Managepolicy - Event hub consumer group - leave blank to default to the
$Defaultconsumer group - Event serialization format - select JSON from the dropdown
- Encoding - leave it set to
UTF-8
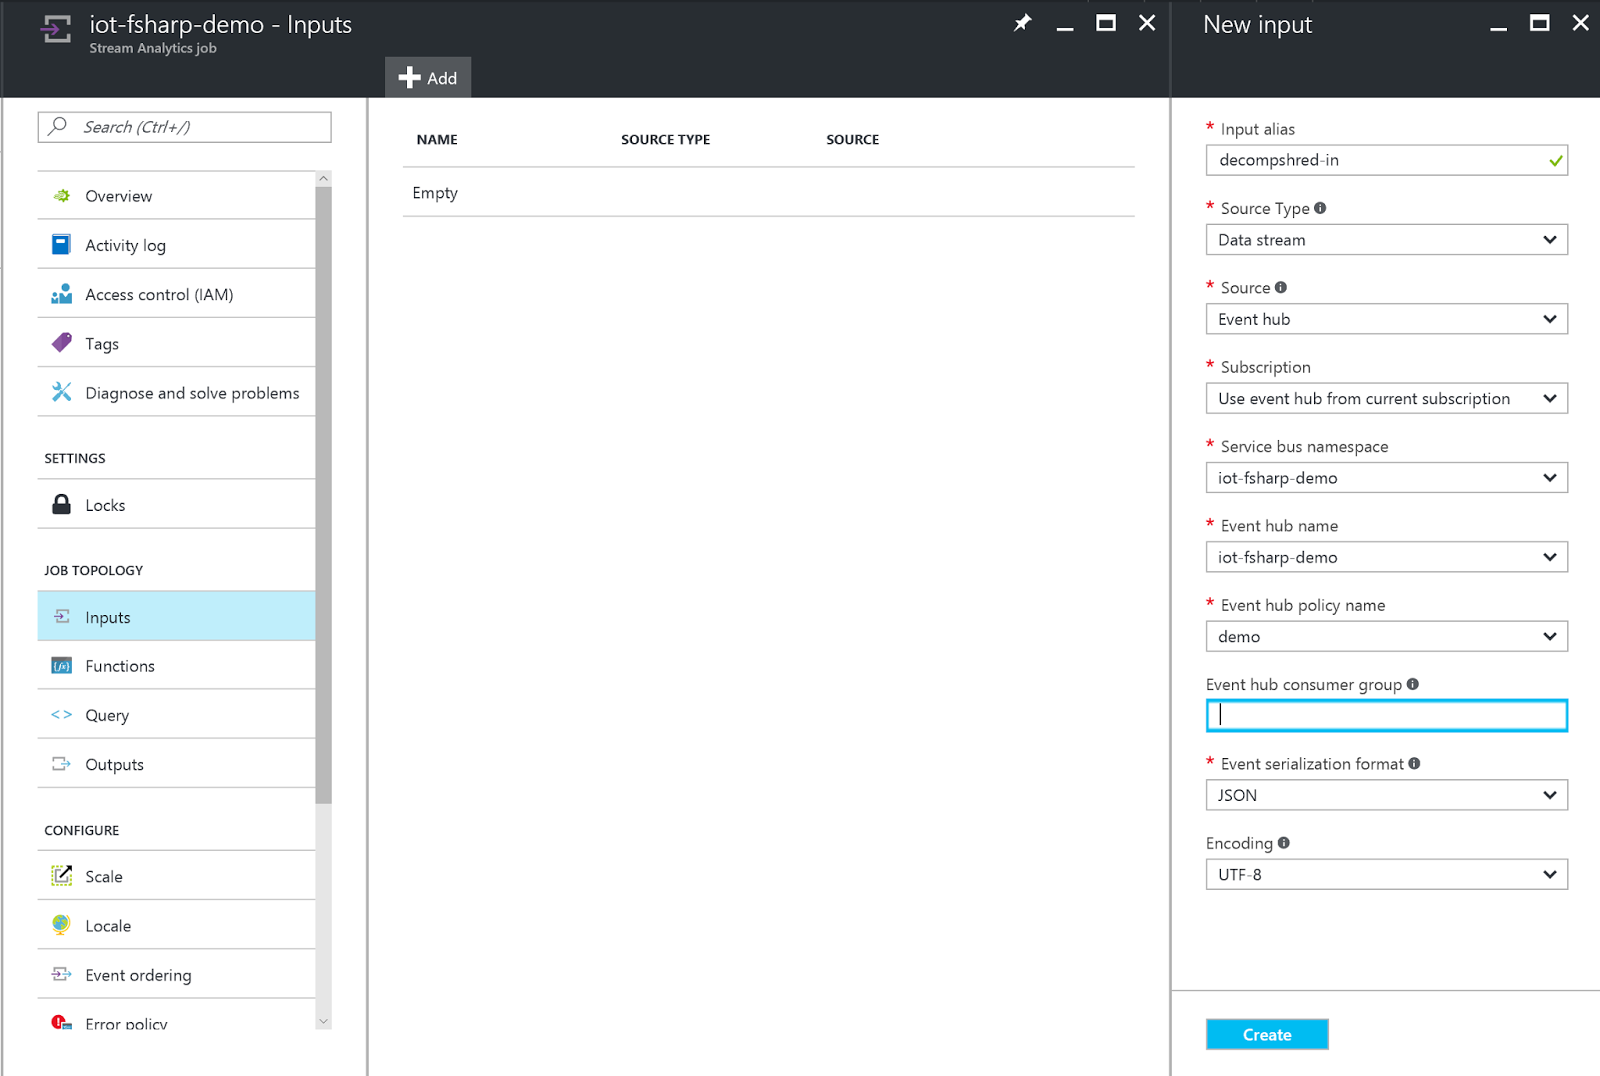
Press Create to complete the input definition.
Select the Outputs tab and press the + Add button at the top of the
pane. Give the output alias a name and set the Sink to Power BI. The
portal will ask for Authorization to wire itself up to a PowerBi subscription.
If you don’t already have a PowerBI account you can create one for free on
the PowerBI Getting Started page.
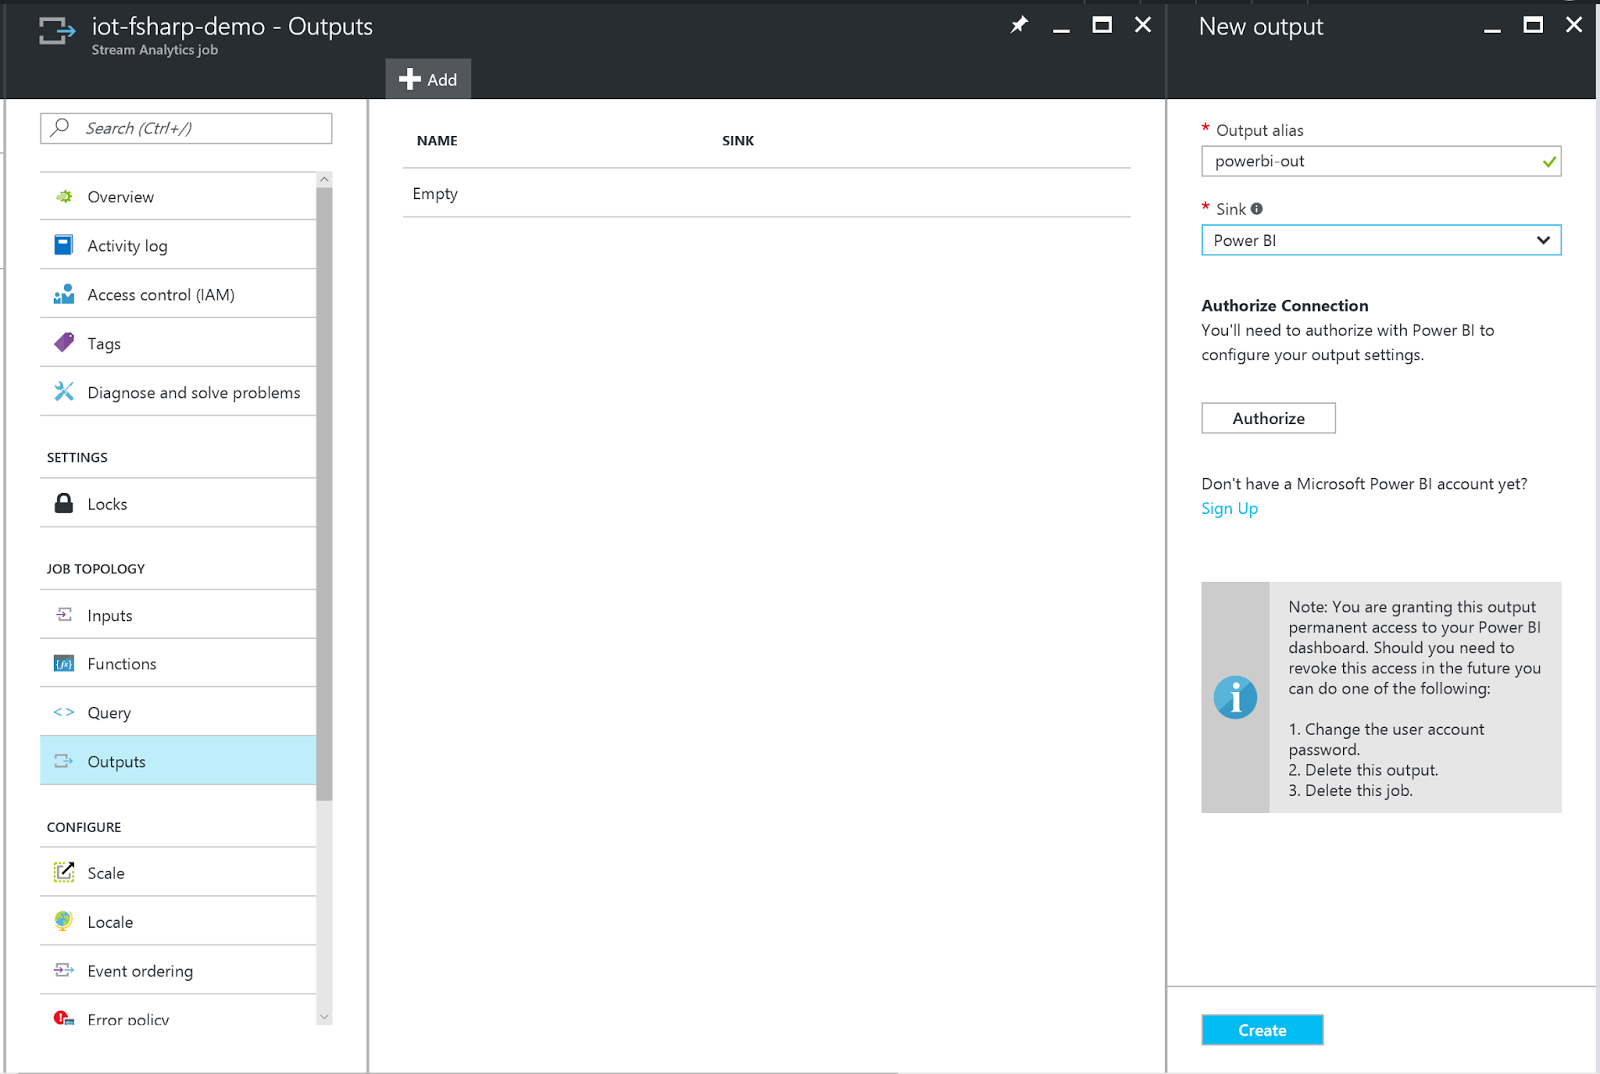
Authorize the Portal to connect to PowerBI which will re-direct you to
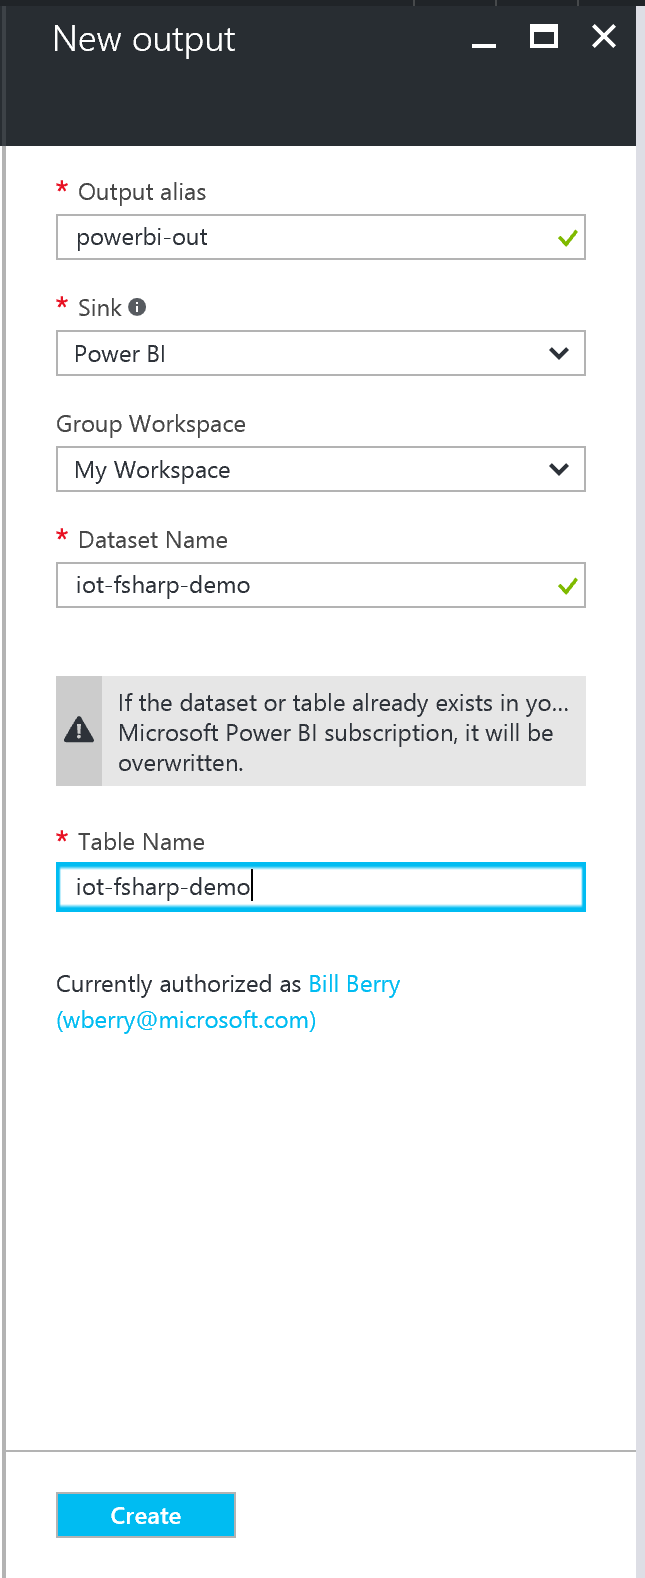
an MSA login screen. Once the login process is completed, the Portal will
redirect you to complete wiring up the ASA job output. For the Group
Workspace drop-down select My Workspace and enter new names for the
DataSet Name and Table Name fields.
With the output defined we can complete the ASA job set up by building
the query that will shape our data for PowerBI consumption. Remember that our
JSON sensor data is a complex data structure with the GeoCoordinate sub-type
that will need to be flattened for PowerBI consumption. Select the Query tab
of the ASA Job which will open a new pane with some default SQL’ish code.
Delete the existing query and enter the following:
This query will create a new data object that flattens the location
data, extracting just the Latitude and Longitude values along with the top
level DeviceId, Wind Speed, and Observation Time values.
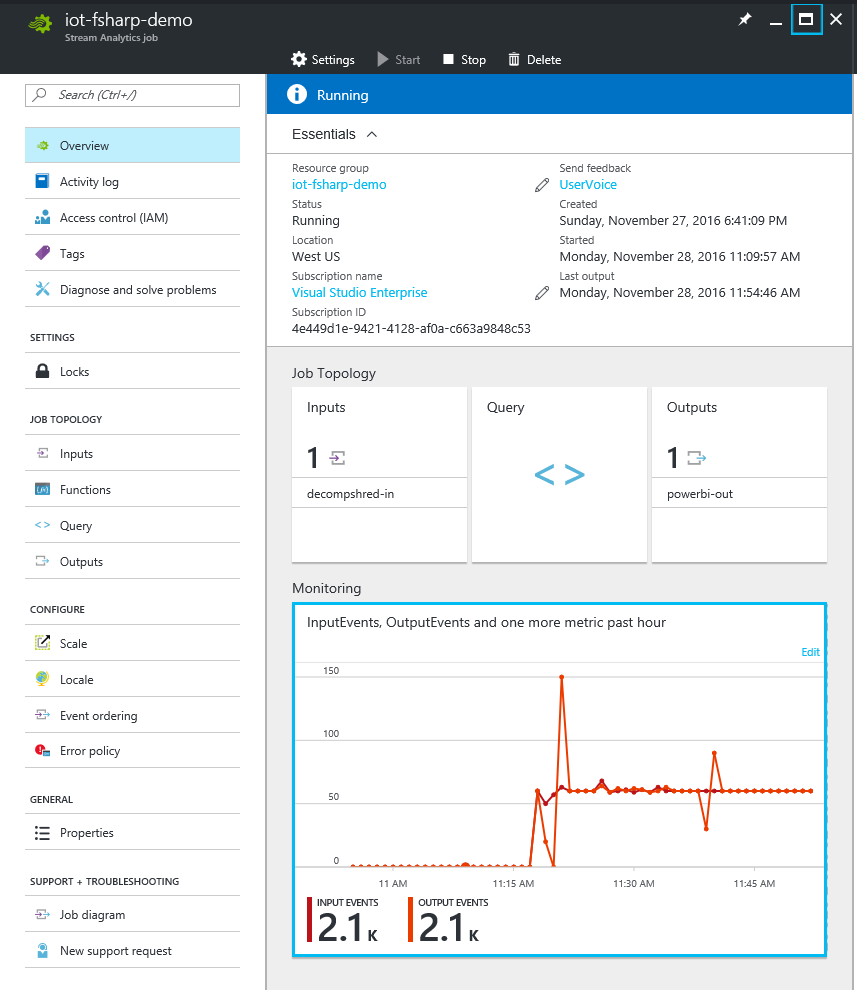
Navigate back to the ASA Overview tab and press Start at the top of
the overview pane. Note that ASA jobs are notoriously slow to start and stop
… be patient, it will eventually start.
Flip back to Visual Studio, set the Device Simulator as the startup
application and run it. After a few minutes you should start to see
Monitoring Events on the ASA overview page.
Power BI
The final step in out F# & IoT exploration is to visualize our sensor data. We’ll leverage PowerBI to display geographic information and a historical line chart for the simulated sensors.
Log into PowerBI and in the left pane scroll down to Datasets, further
selecting Streaming datasets. This will bring up a menu of the available
streaming dataset, one of which should be the output of the ASA job.
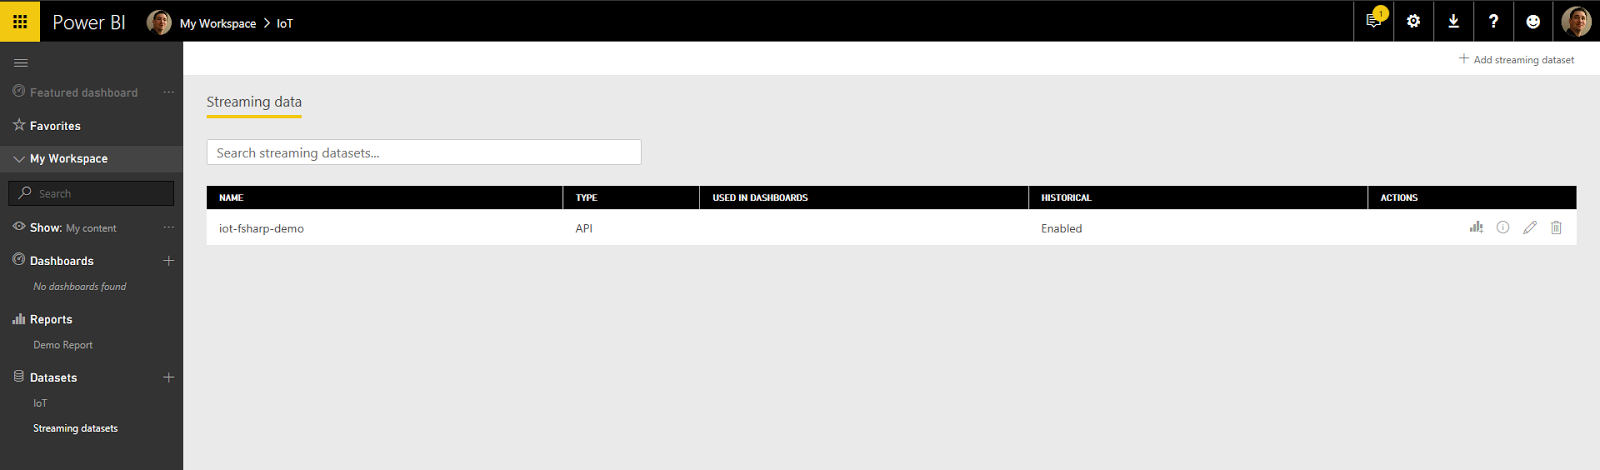
On the far right on the IoT dataset, press the Create Report icon. You will
be redirected to a new blank report. From the Visualizations fly-out on the
right, select the regular “Map” visualization.
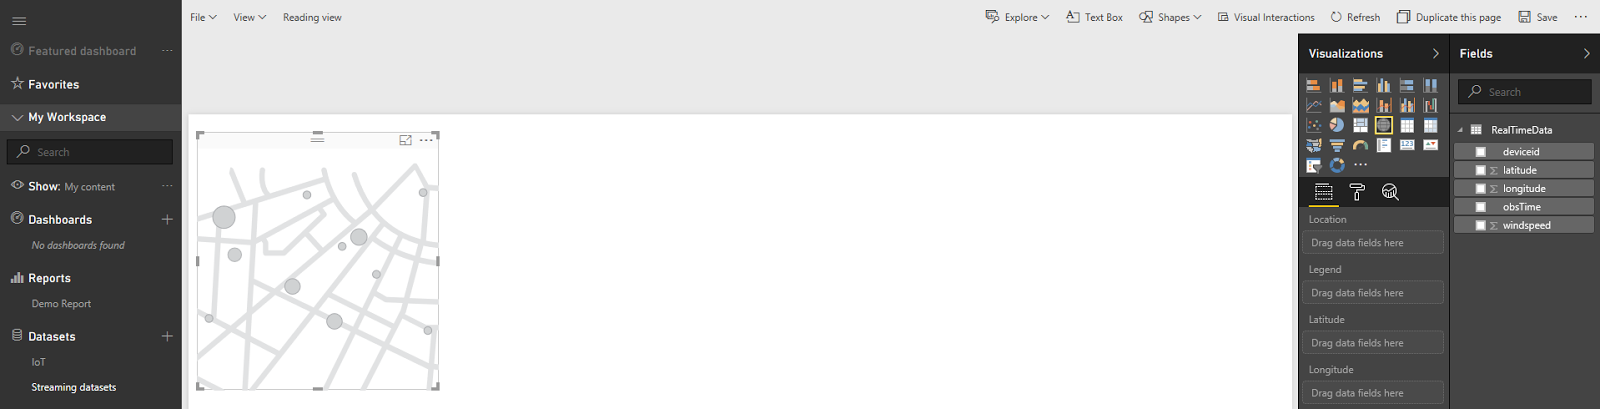
To create the geographic map:
- Drag the
deviceIdField into the Legend of the visualization - Drag latitude to Latitude
- Drag longitude to Longitude
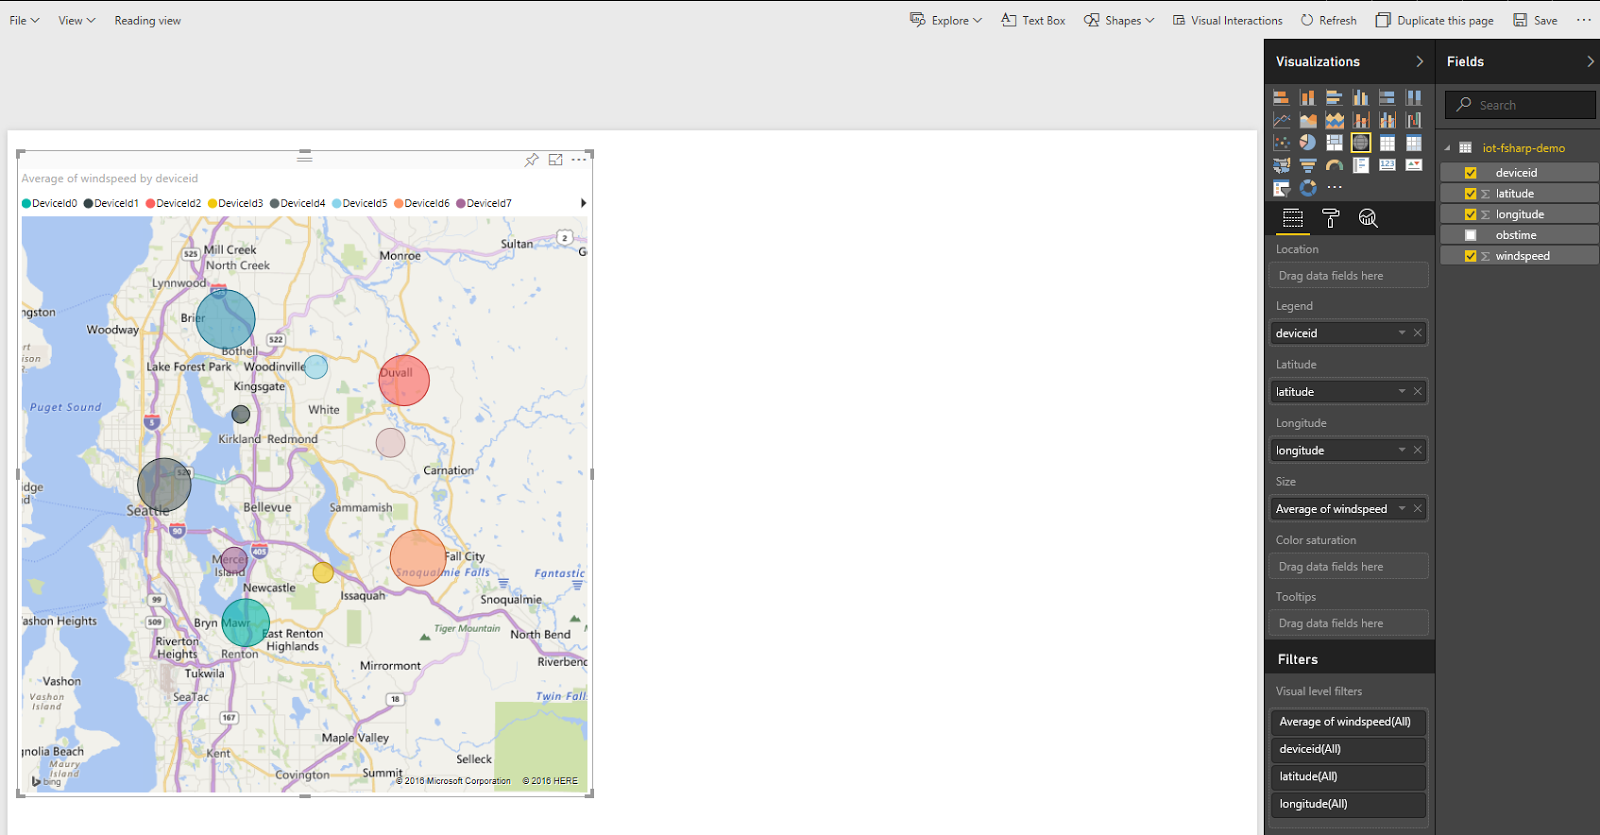
- Drag windspeed to Size, select the twill and set the value to the
AverageThe resulting graph will look like this:
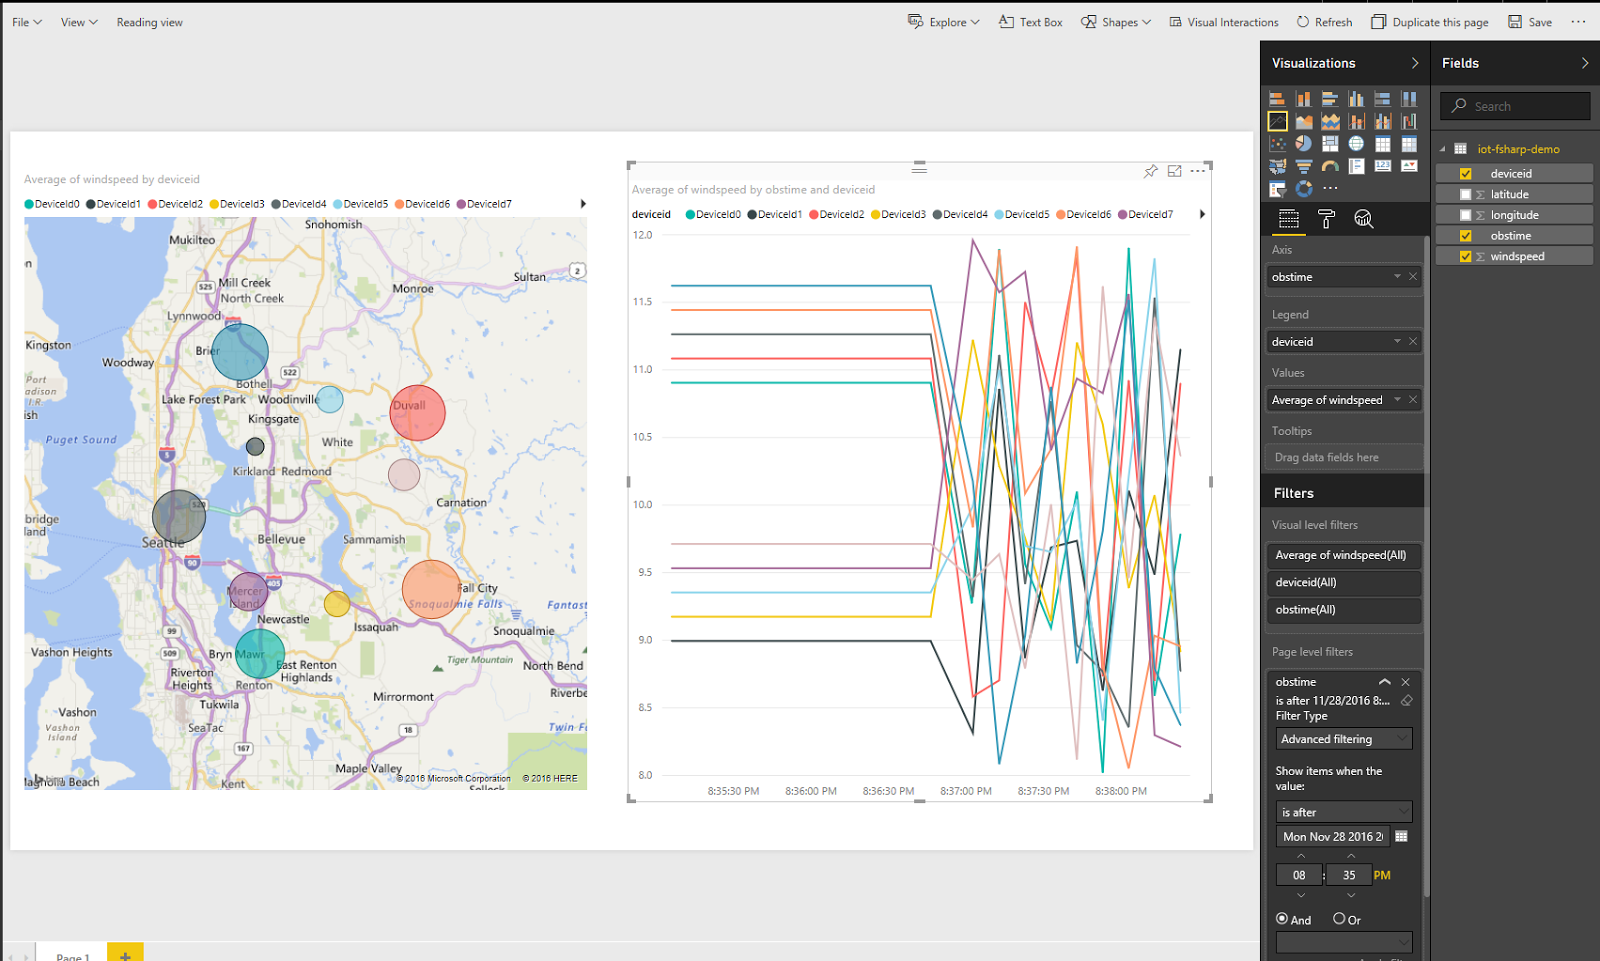
To generate the historical speed chart, add a line chart to the report and set the following values:1. Axis - osbTime
- Legend - deviceId
- Values - Average of windSpeed With a bit of filtering you’ll end up with a report like so:
Conclusion
I hope this tutorial has illuminated some of the ways that F# fits nicely into the world of IoT, especially in the context of Cloud solutions. We’ve gone from data generation, through transmission; onto data post-processing and through visualization. At each one of these steps are opportunities where F# and the community’s F# tooling can play a deeper and more meaningful role. And the best part of all this? … Our community is only getting started. We still have so much to say about topics like application correctness, developer productivity, and nearly every aspect of security.
My final call to action, equally for those new and old to the language alike, is to stay involved, come listen to people speak or speak yourself, try out the libraries, unit test your C# code with F#, build pet projects, build complex systems, hell build the next Jet; but most of all, remember to enjoy writing code. We write F# because it makes coding fun again, it pushes us to be better, it enables us to be better engineers/coders/developers.
Further Exercises1. Create functions across the demo applications that will
build the connection string from its elements.
- Use Fable to create a custom PowerBI Visual.
- Create a simulator application and run on Raspbian on a Raspberry Pi
- Explore the Azure IoT Gateway SDK and compile a series of F# modules to run in the Gateway on Windows IoT Core
- Create and app that will tap the IoT Hub Event Hub interface and pull off a sampling of messages using EventProcessorHost
- Test out the Cloud to Device Messaging, Device Management and Device Twin features of the Azure IoT SDK.