
NuGet Servers, HBase, Thrift Code Generation and one sweet Jenkins CI Build
Its always a bit of a joy when pet and client projects align on similar goals, the proverbial ‘killing of two birds with one stone’. Admittedly though, I applied a touch of coercion to get these in sync.
The client project:
- HBase Thrift connector in C#, which has a code generation step to convert the HBase thrift file into a C# lib.
The pet project(s):
- Internal NuGet Server
- Scripts for Jenkins to run a code generation process
- Scripts for Jenkins to build NuGet packages
- Programmatically building a C# Visual Studio project Though it is not the specific focus of this post, I will lightly cover the HBase thrift connector for those that are interested. So without further adieu, lets get to work…
Step 1 - Build the NuGet Server
I screwed around for a while with the NuGet package that lets you build your own self hosted server. For those that have the unnatural desire to tweak all the nobs … try it out. I admit, I gave up very early in the process after realizing I could:
- Use a pre-baked solution that was a snap to install and configure.
- Throw money at someone when our dependency on the product finally warranted support.
ProGet (from Inedo) was a great fit.
Product is a snap to install, and configure. I simply set up an IIS website
as follows:
- Define a default localhost:port binding (this was configured when installing the product).
- Define a redirect binding of nuget.{server}.{domain}.com to the localhost setup.
- Under the site’s authentication settings, enable Windows Authentication, disable anonymous, remove the Negotiate provider from the Windows Authentication provider.
- Under authorization rules, add an entry for your group as “allow”.
- Ping your IT/Active Directory team to add the redirect url to the groups trusted sites list.
In our department, we primarily use IE and Chrome, both honor the GPO trusted sites list though the setting does not always stick the first time through. If that’s the case for you, and the site is asking for authentication, be sure to kill IE & Chrome, run a “gpupdate /force”, then log out and back in again … it should work now.
Lastly, NuGet Package Manager in Visual Studio works seamlessly with Windows NTLM Authentication. With the site running, you now have a group authenticated, nominally secured internally hosted NuGet Server. I think that deserves a “Sweet, Right On!”
Step 2 - Configure NuGet<div>We have a few things to configure to get NuGet
up and running after installation. The developer’s workstations will need to be patched to the new server so they can find your internally hosted packages and all build machines, plus their slaves, will need an additional configuration file.
First things first, lets get the URL for our new server; this had me stumped for a bit. Visit your new site in your browser of choice, select “Browse Packages” and then click on the RSS Feed button on the presented page.
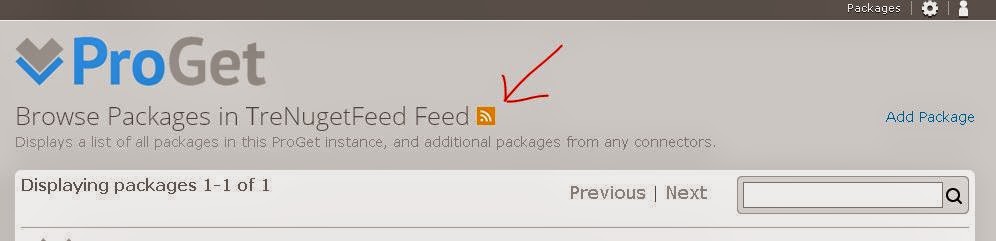
You will be presented with a page that has the Atom XML data, just grab the Url and fire up Visual Studio.
The Visual Studio changes are a snap. Under Tools -> NuGet Package Manager, select “Manage NuGet Packages for Solution.” You will be presented with the hopefully familiar screen:
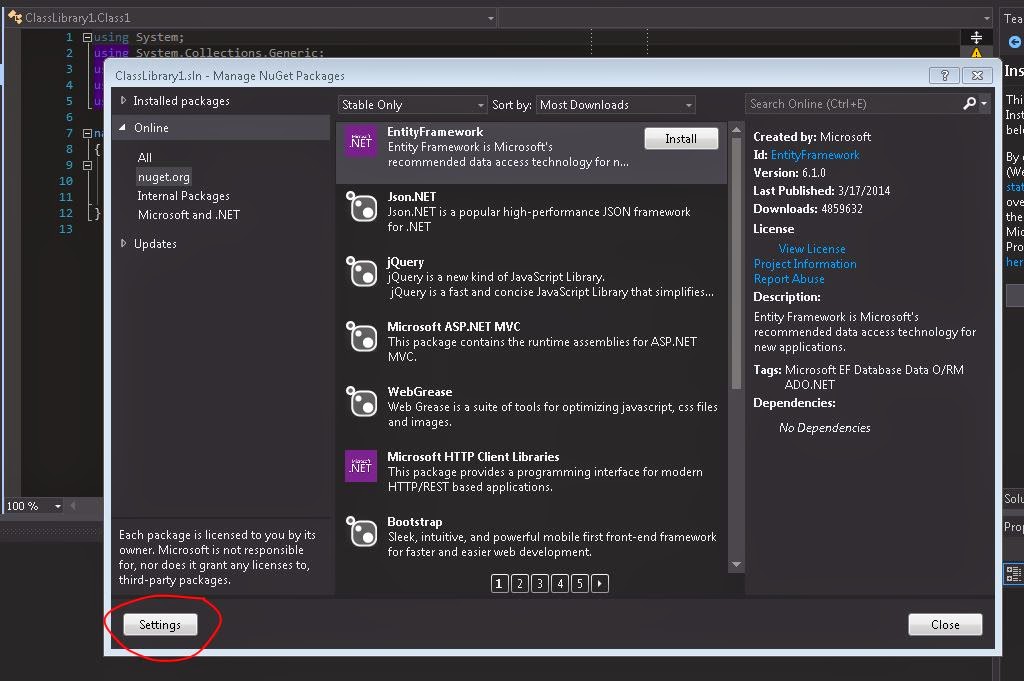
Clicking on Settings in the lower left corner will bring you to the Visual Studio “Options” Window with Package Sources Settings in focus.
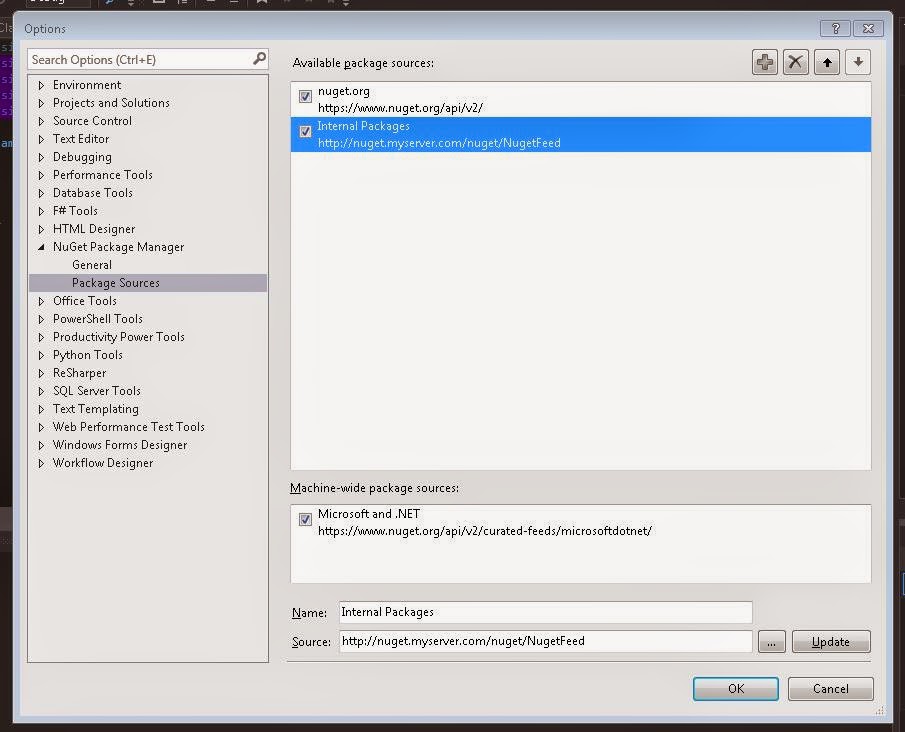
In the upper right corner click the “+” button and add the url you
copied from your browser earlier, and a name for your new NuGet Server.
Select “OK.”
The next point to address is configuring the Build Server(s) and any slaves that perform NuGet Package Restores.
For almost all of our projects, we enable Nuget Package Restore. This can be done by adding the following markup in your Nant target right before the call to MS Build.
<setenv>
    <variable name="EnableNuGetPackageRestore" value="true" />
</setenv>
No matter which NuGet executable is called, the one included in your project or one installed on the host itself, the program can use a global config file located in “C:\ProgramData\NuGet”. Create the NuGet folder if it does not exist and add a file called NuGetDefaults.config. You can Google plenty of resources on what can go in this file; but, what is essential is the following markup:
<?xml version="1.0" encoding="UTF-8"?>
<configuration>
    <packageSources>
        <add key="nuget.org"
             value="https://www.nuget.org/api/v2/" />
        <add key="Nuget Source"
             value="http://nuget.myserver.com/nuget/NugetFeed" />
    </packageSources>
</configuration>
The markup here simply adds the sources that the build server may restore packages from; in this case both nuget.org and our internal site.
NOTE: there are some pretty slick options when it comes to ProGet which you should look into. You can have your local server act as a proxy for nuget.org and filter out packages with licenses that are incompatible with your environment. Obviously it does not keep a dev from subverting legal requirements by simply including a package with the source commit; but, it can help stop accidental usage.
With our config file set up on the build server(s) and the dev environments patched, we can turn our attention back to getting our first package up on the new NuGet server.
Step 3 - Thrift C# Code Generation<div>Though its a bit of a tangent to the
core of this post, I am going to use the building of the C# classes for a Thrift to HBase connector as the example.
Our first step is to set up a blank, no frills Visual Studio class library project. Once that’s up, go into the NuGet Package Manager and import the “Thrift” package by the Apache Software Foundation. As of the writing of this article the version is 0.9.1.3. There are really only two important things in this package:
- A precompiled Windows Thrift compiler, thrift.exe.
- The Thrift.dll which you will provide the common implementation code for your thrift interface.
NOTE: quite obviously, both of these projects are publicly available.
Though there is some complexity to compiling them yourself, you could for
example, set up Jenkins to poll the github repository, scrape the tags on
master, pull the most recent branch, version and build both the compiler and
the core thrift.dll, posting the output automatically to your NuGet server.
You *COULD do that; but personally, I would rather just link the existing
thrift NuGet package.*
With the thrift NuGet package pulled into out project we are only missing the base.thrift file from the trunk of the apache HBase project, found here. Pull this file into a folder in your project, I put it under CodeGen\ThriftFiles.
One stupid note about this file. As with most cross platform GitHub
projects the line endings can be nearly random. As of the writing of this
post, they are old school Mac ‘\r’, which may or may not screw things up.
Regardless, you will see in the code generation script that I normalize the
file to Windows’ line endings as a precaution.
We will be writing a PowerShell script to accomplish the code generation. You can obviously use what ever you like. I selected PowerShell … because. Nuff-said and no comments on this from the peanut gallery.
The basic flow of our script is as follows:
- Clean the line endings of the thrift file.
- Create the output folder if it does not exist, if it does clean it.
- Pass the hbase.thrift file into the thrift compiler and generate the C# classes.
- Get the names of all the generated files.
- Open the .csproj file, select any existing nodes to remove and add the generated files.
- Save the .csproj file.
NOTE: I do not claim any responsibility for the code I am about to present. As a recent migrant to PowerShell, I am putting myself and my code out there without warranties or promisses that it is either A) written well or B) even remotely how it should be done. I so encourage commentary from the peanut gallery on this, if there is any. I do appreciate learning how things could/should be done correctly.
Let’s start by setting up some variables:
$ErrorActionPreference = "Stop"
$TargetDir             = '.\src\ThriftInterface\autogen\'
$ThriftExecutable      = '.\src\packages\Thrift.0.9.1.3\tools\thrift-0.9.1.exe'
$HBaseThriftFile       = '.\src\CodeGeneration\ThriftFiles\hbase.thrift'
$Language              = 'csharp'
Fix the line endings in the thrift file as noted earlier:
(Get-Content $BaseThriftFile) |
         Foreach-Object {
                 $_ -replace '`r`n' , '`r' -replace '`n' , '`r'
         } |
         Set-Content $BaseThriftFile
Create the target output folder if it does not exist, clear its contents either way:
Write-Host "Checking for existance of $TargetDir"
if(!(Test-Path -Path $TargetDir )){
    Write-Host "Target does not exist, creating $TargetDir"
    New-Item -ItemType directory -Path $TargetDir
}

Write-Host "Clearing contents of $TargetDir"
$tardir = $TargetDir + '\*.*'
Remove-Item $tardir -recurse -force
Pass the cleansed file into the thrift compiler, specify the target language and direct the output:
Write-Host "Begining code generation phase; output set to $TargetDir"
$arguments = "-out $TargetDir --gen $Language $BaseThriftFile"
Invoke-Expression "$ThriftExecutable $arguments"
Write-Host "Finding Auto-generated Code in Directory: $TargetDir"
$tardir = $TargetDir + '\HBase\*.*' # HBase is the namespace
$autogenFileNames = Get-ChildItem $tardir |
                    Where-Object {$_.Extension -eq ".cs"}
Read the .csproj file into a variable:
$proj = [xml](get-content
                 (Resolve-Path '.\src\ThriftInterface\ThriftInterface.csproj'))
Typically most project files only have one compile Item Group definition. We will want access to that node later for the additions, so select it into a variable. Then find any existing auto-generated file nodes and remove them.
$ParentNode =  $proj.Project.ItemGroup.Compile.ParentNode |
               Select-Object -First 1
$removeElements = $proj.Project.ItemGroup.Compile |
                  ? { $_.Include -Match "autogen" }
if ($removeElements) { $removeElements |
                       % { $_.ParentNode.RemoveChild($_) }
                     }
Finally, we want to loop the folder where the compiler put the generated code, add those files into the compile item group and save the project file.
foreach ($fileName in $autogenFileNames.Name) {
         $xmlElt = $proj.CreateElement("Compile", $nameSpace)
         $xmlAtt = $proj.CreateAttribute("Include")
         $xmlAtt.Value = "autogen\Hbase\$fileName"
         $xmlElt.Attributes.Append($xmlAtt)
         $ParentNode.AppendChild($xmlElt)
}

$proj.Save((Resolve-Path ".\src\ThriftInterface\ThriftInterface.csproj"))
exit
So there you have it. In 30 lines of code we have converted a .thrift file into a functioning Visual Studio Project!
Step 4 - Script NuGet Package Creation<div>Our next task is to create
a light script that can wrap up our project into a NuGet package. This requires all of about 8 lines of code.
$ErrorActionPreference = "Stop"
$curpath= ".\src\ThriftInterface\"
$projectName= "ThriftInterface.csproj"

NuGet Pack "$curpath$projectName" -Properties Configuration=Release -OutputDirectory $curpath

$package = @(Get-ChildItem $curpath -include *.nupkg -recurse | Sort-Object)
$key = "*********************"

nuget push -Source "http://nuget.myserver.com/nuget/TreNugetFeed" $package[-1] $key
exit
The script sets up some locals, runs nuget pack on the project with the proper build settings and calls nuget push on the package with the Api key to the NuGet server url.
Step 5 - Put It All Together With JenkinsFinal step here is to wrap the
whole project up with a Jenkins job. We need to commit our project shell to source control: Git/HG/SVN. Whatever works. All of our projects include a moderately stock Nant script that sets up package structure for the binaries; which we will run in this example. Even though the NuGet script in Step 4 also performs a build, the Nant build will generate the artifacts for the binary repository. And there is no real issue with building it twice.
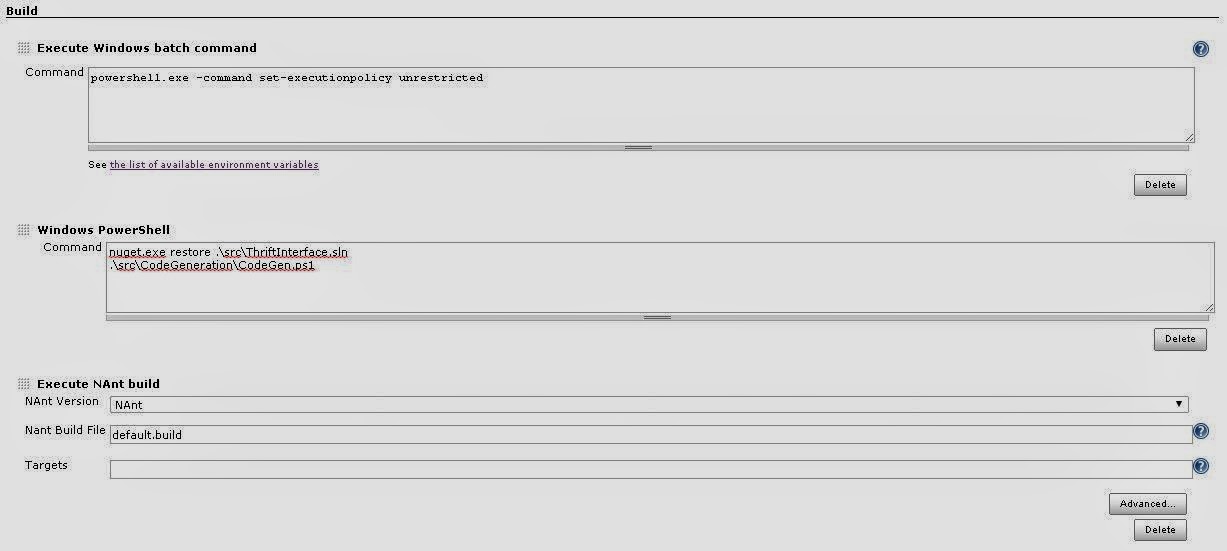
Under the build in Jenkins we will configure the execution of out code generation script. Since the PowerShell script is not yet signed, we need to set the execution policy to unrestricted.
powershell.exe -command -set-executionpolicy unrestricted
Follow that up with a call to restore the Thrift NuGet package we included in the Visual Studio Project.
nuget.exe -restore
.\src\ThriftInterface.sln
This call will ensure that we have the compiler and thrift core dll on hand for the code generation and build steps. With everything in place we can call out code generation script and follow that with the Nant build.
.\src\CodeGeneration\CodeGen.ps1
Assuming compilation success we can add a post build task to run our NuGet packaging script.
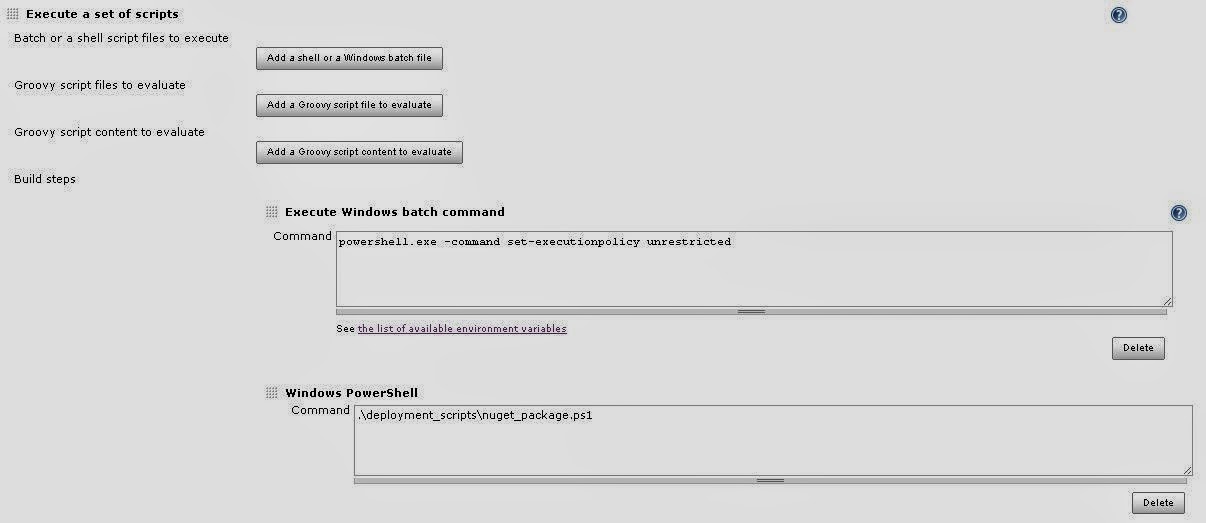
Again we need to set the environment execution policy to unrestricted.
powershell.exe -command -set-executionpolicy unrestricted
And finally call our NuGet packaging script.
.\deployment_scripts\nuget_package.ps1
With everything set up, save the configuration, scroll back to the top of your Jenkin job, and press the magical “build now” button. With luck on your side you should be able to browse your NuGet server and see your new package.
There will likely be an upcoming post that builds upon this one, delving into creating a Linq provider on top of the HBase thrift lib generated here. Feel free to comment here or ping me on Twitter @williamberryiii with questions.